ソフトウェア研究室
ユニットテスト2 サンプルコード作成と実行
本ページではGitとJenkins及びRedmineと連携してAntを使用した自動ビルドからユニットテストを行うためのサンプルコード作成と実行について説明します。
1. サンプルコード作成
前回作成した「test1」プロジェクトに追加していきます。
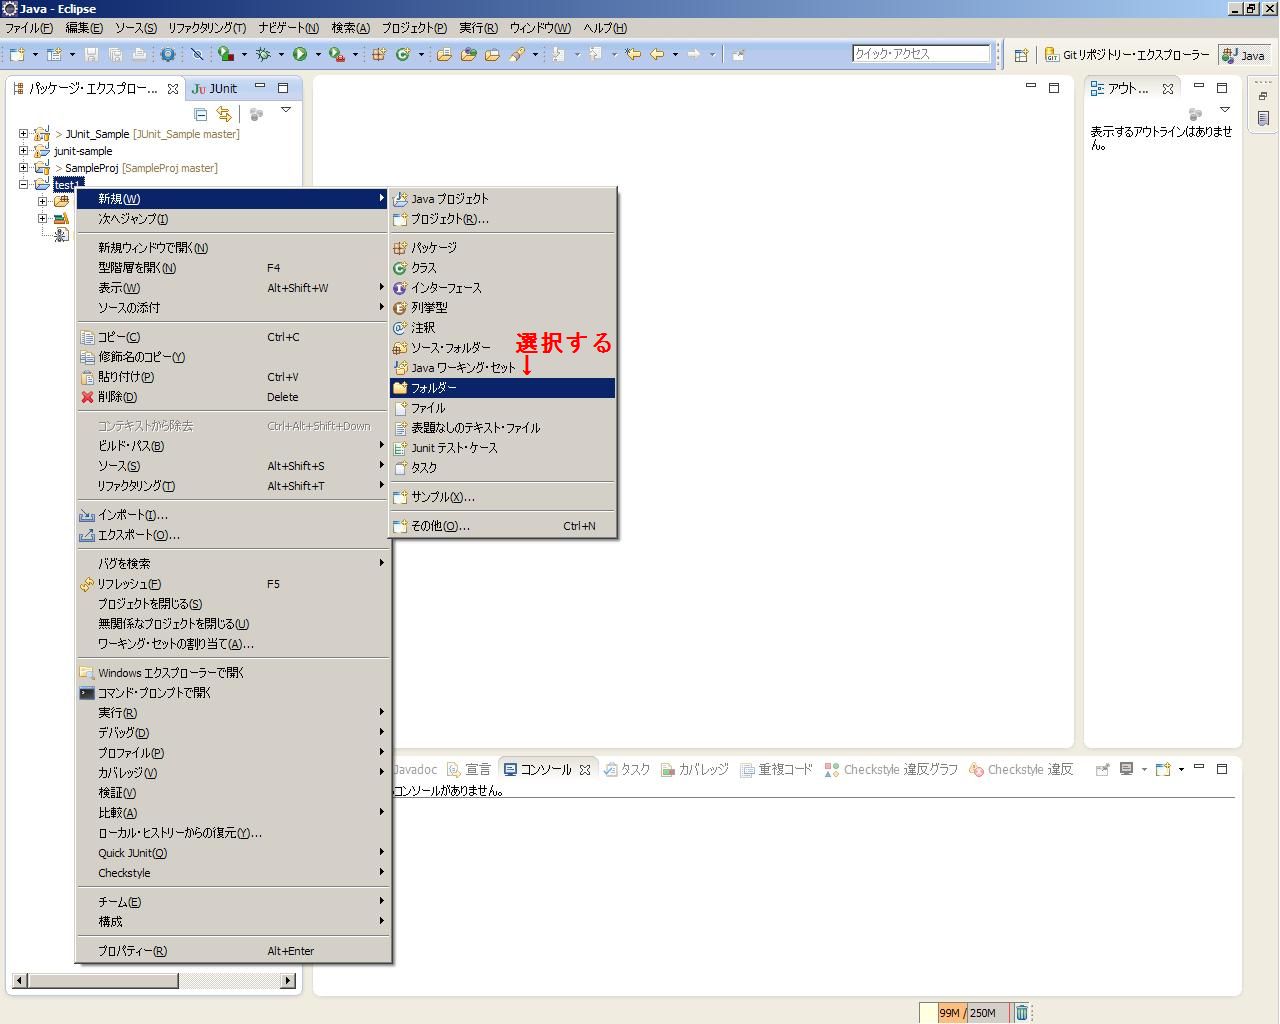
まずはフォルダを追加します。
上記画像のように「test1」プロジェクトを右クリックして、「新規」→「フォルダ」を選択します。
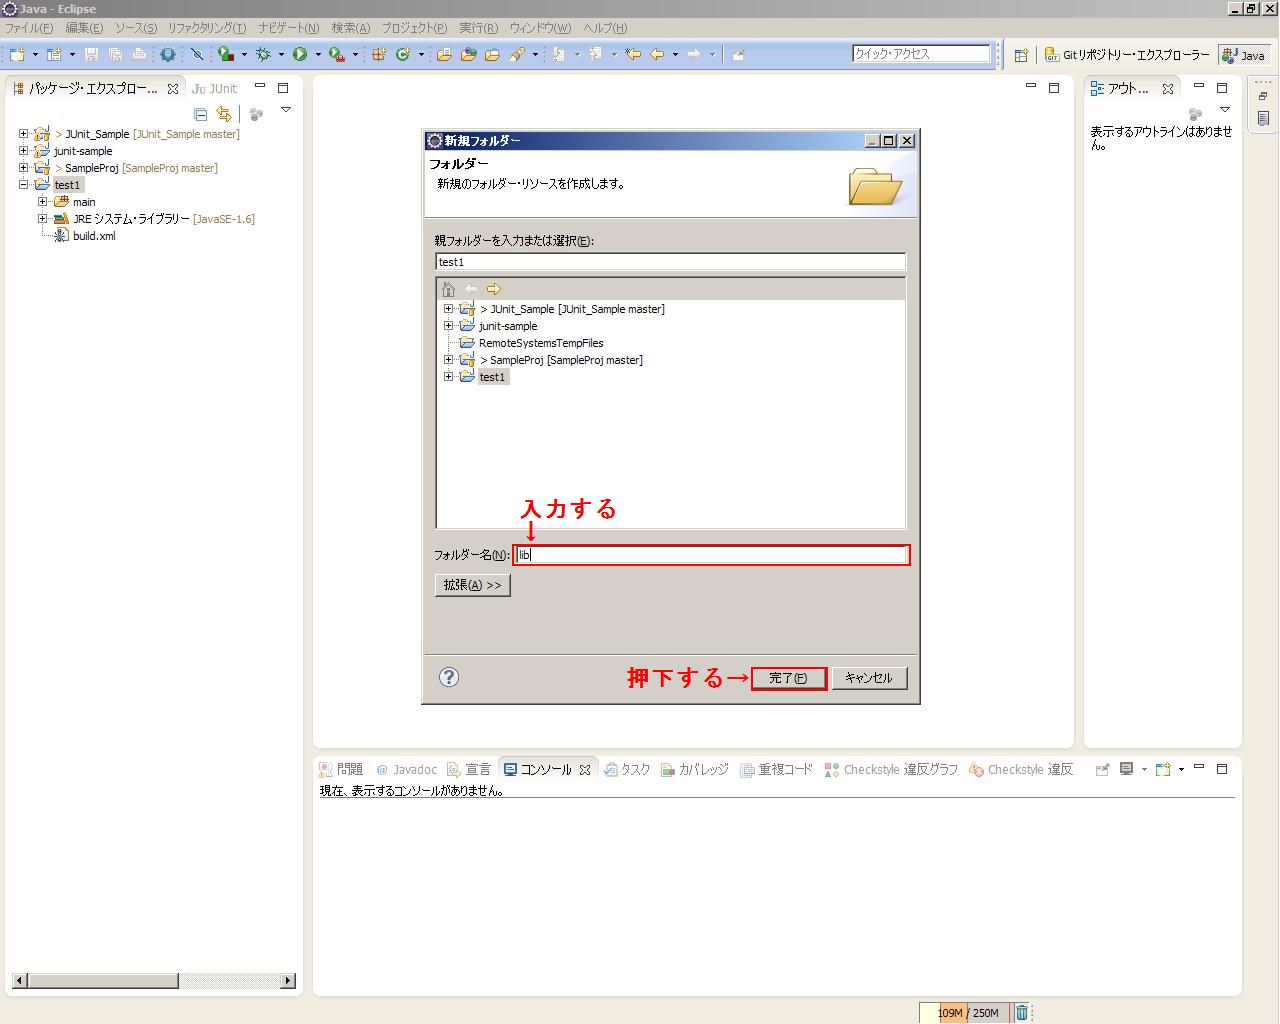
上記画面が開いたら、「フォルダ名」を「lib」と入力して下さい。
「完了」ボタンを押下して下さい。

「lib」フォルダが作成されています。
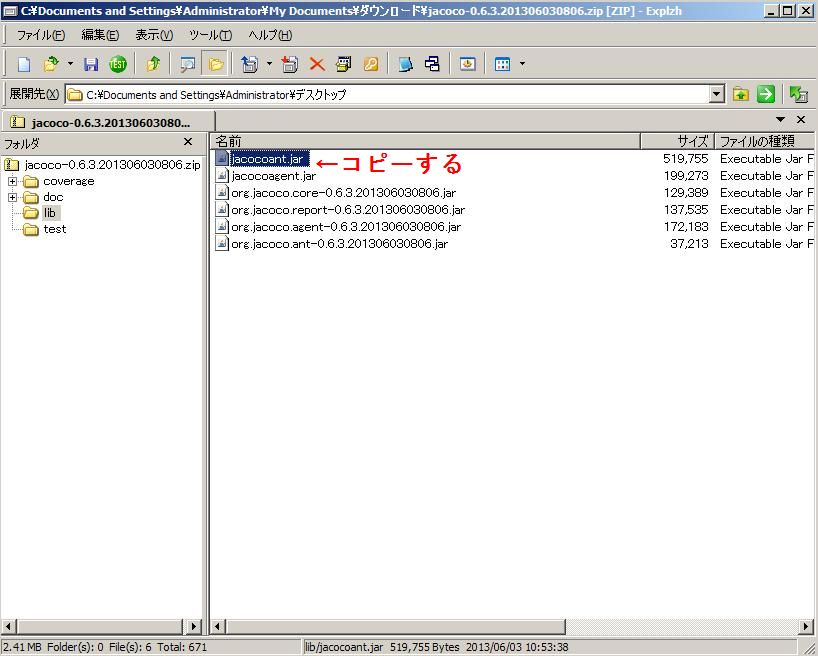
前回ダウンロードしてきた「jacoco-0.6.3.201306030806.zip」を解凍して下さい。
解凍フォルダに「jacocoant.jar」があります。これをコピーして下さい。
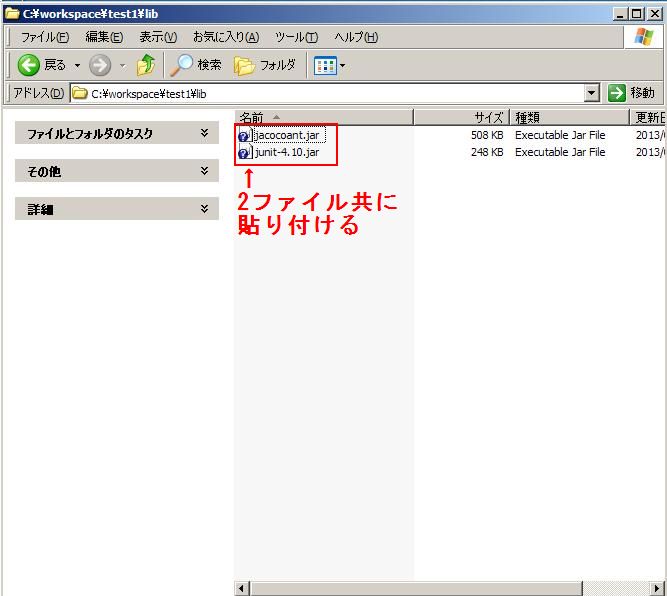
コピーが完了したら、ワークスペースの「test1」フォルダの中に先ほど作った「lib」フォルダがあるので、その中に貼り付けて下さい。
またこの時、上記画像のように前回ダウンロードしてきた「junit-4.10.jar」も同じ場所に入れて下さい。
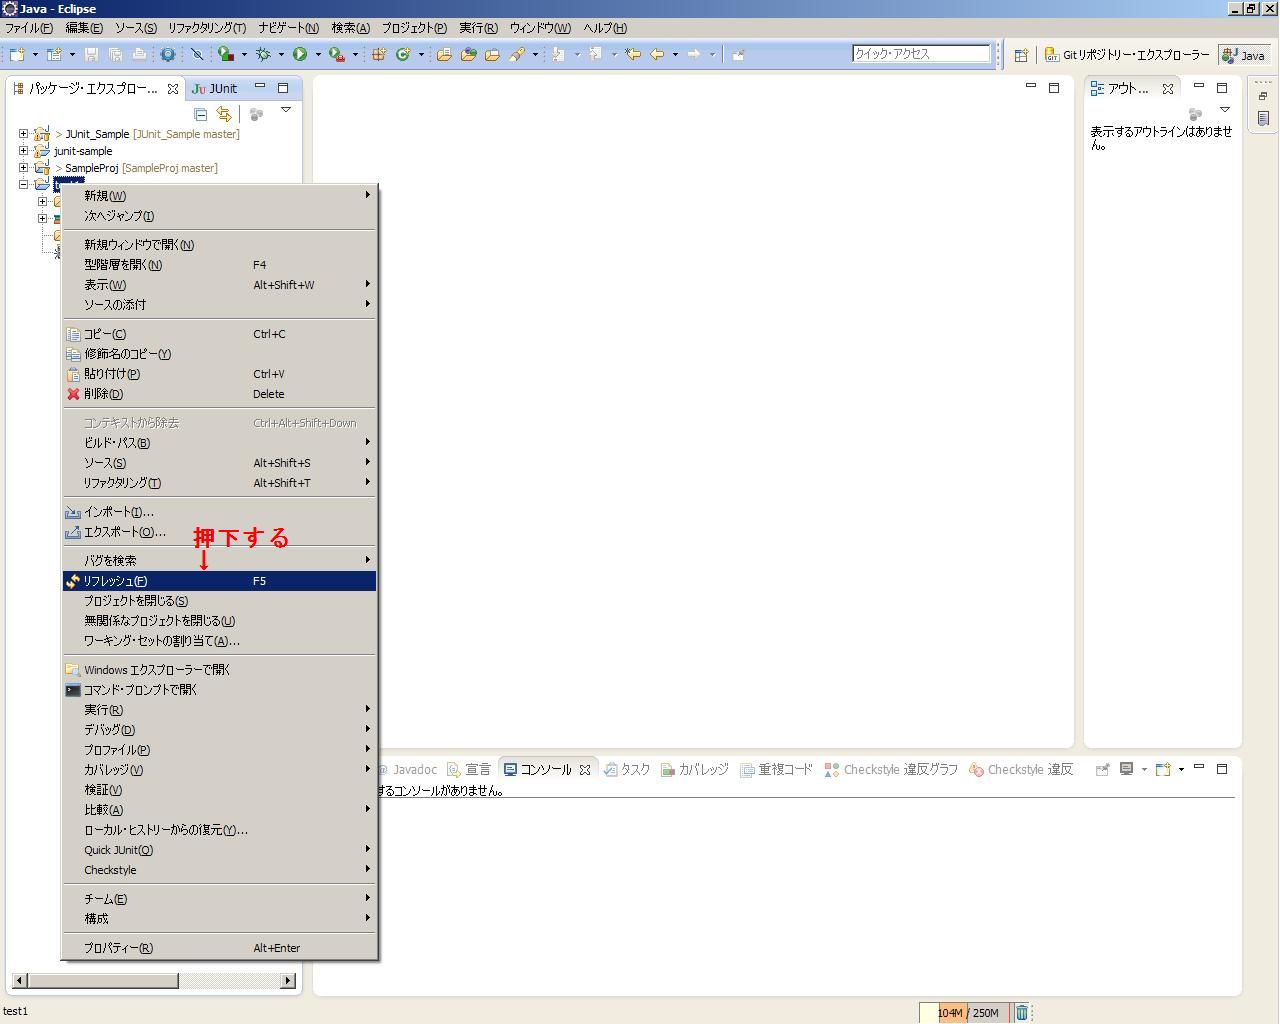
Eclipseに戻って、「test1」プロジェクトを右クリックして「リフレッシュ」を押下して下さい。
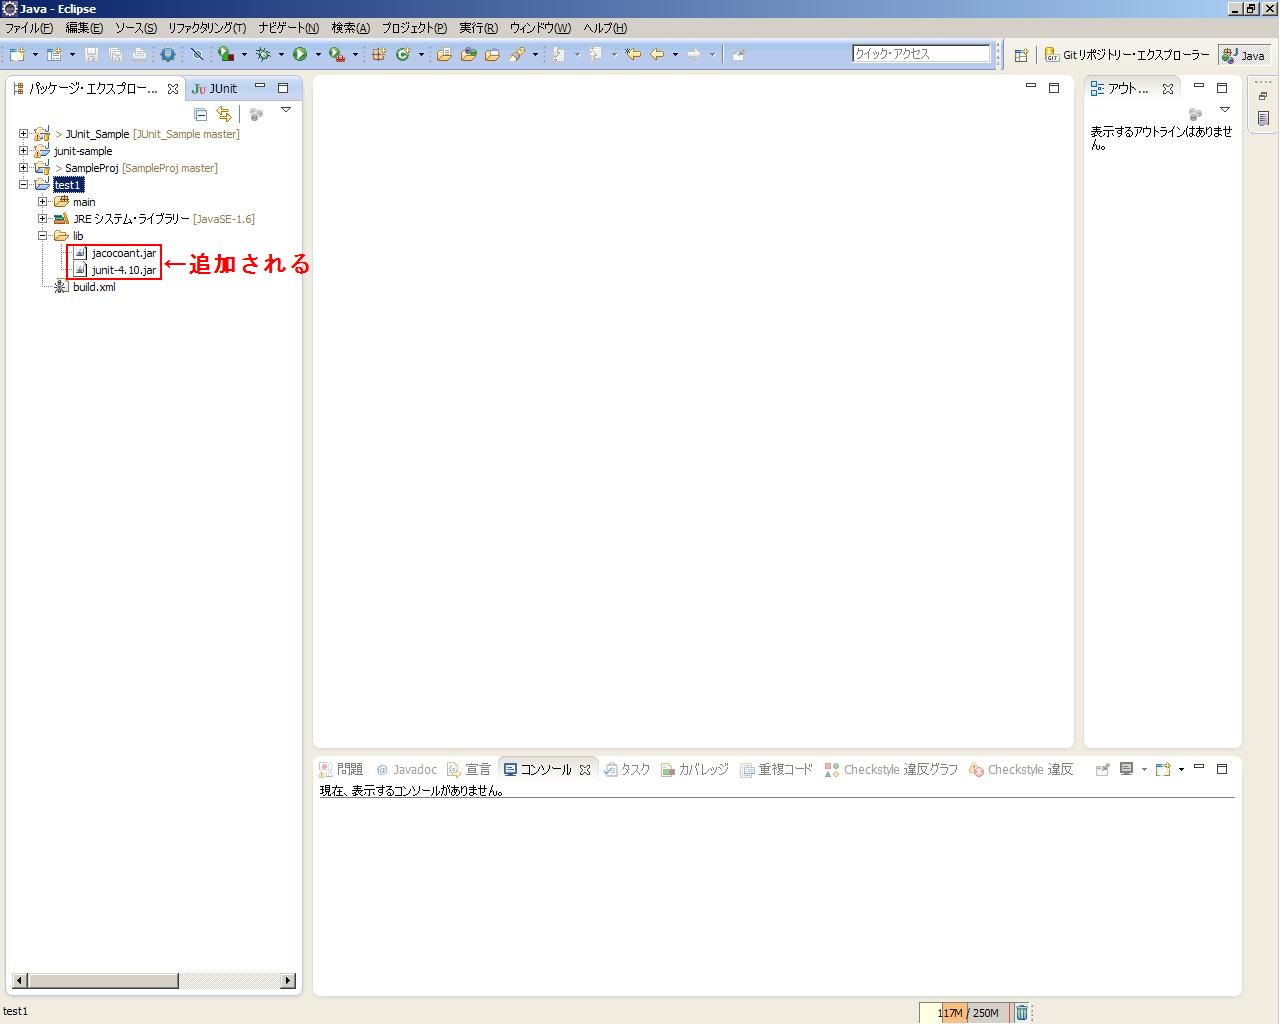
画像のように「lib」フォルダの中に追加した「jacocoant.jar」「junit-4.10.jar」ファイルが表示されます。
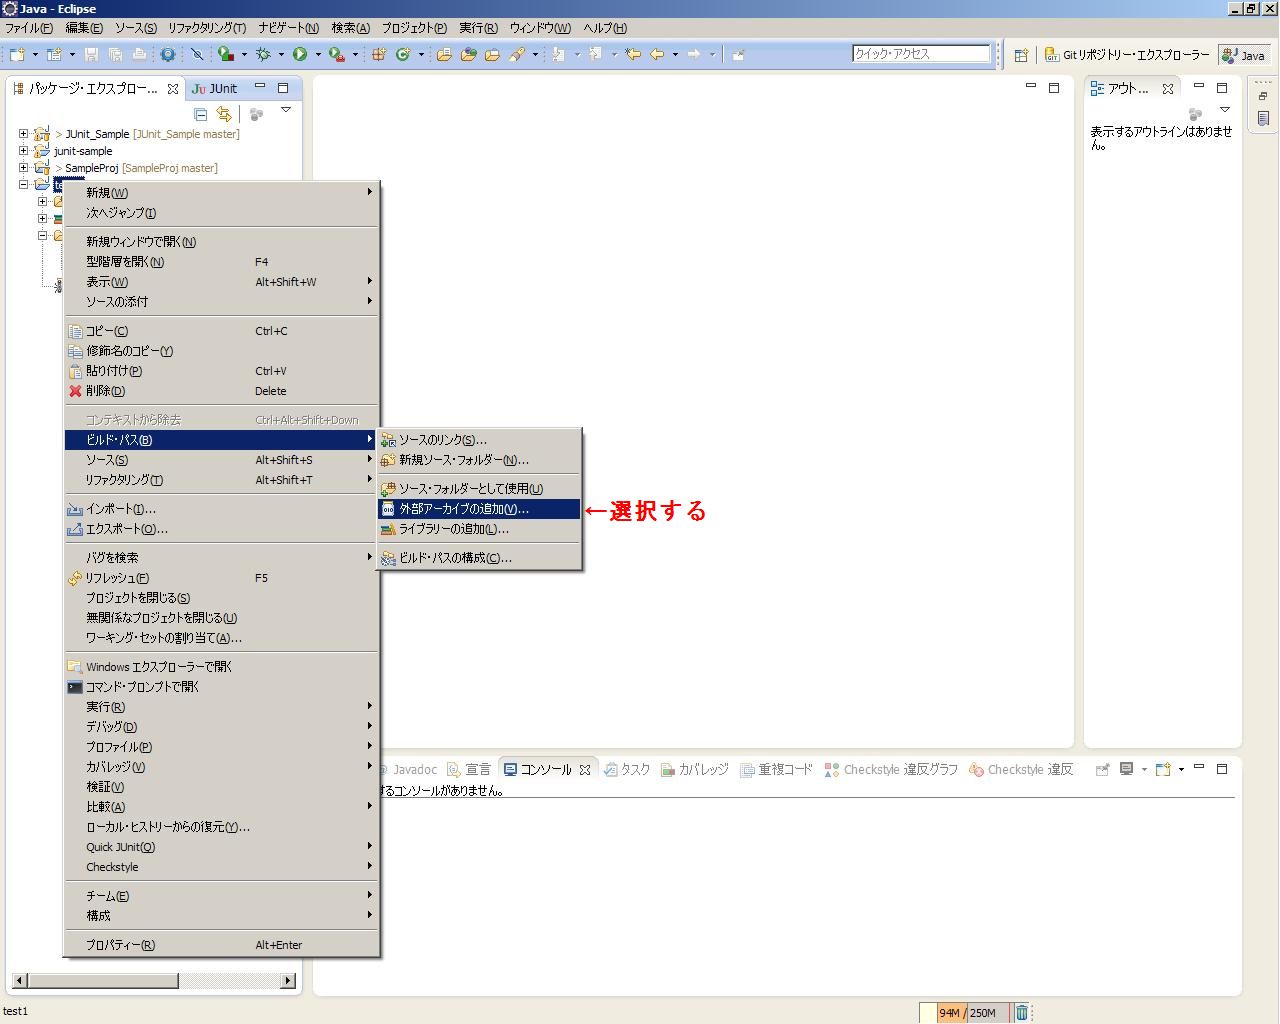
「test1」プロジェクトを右クリックして「ビルドパス」→「外部アーカイブ」の追加を選択して下さい。
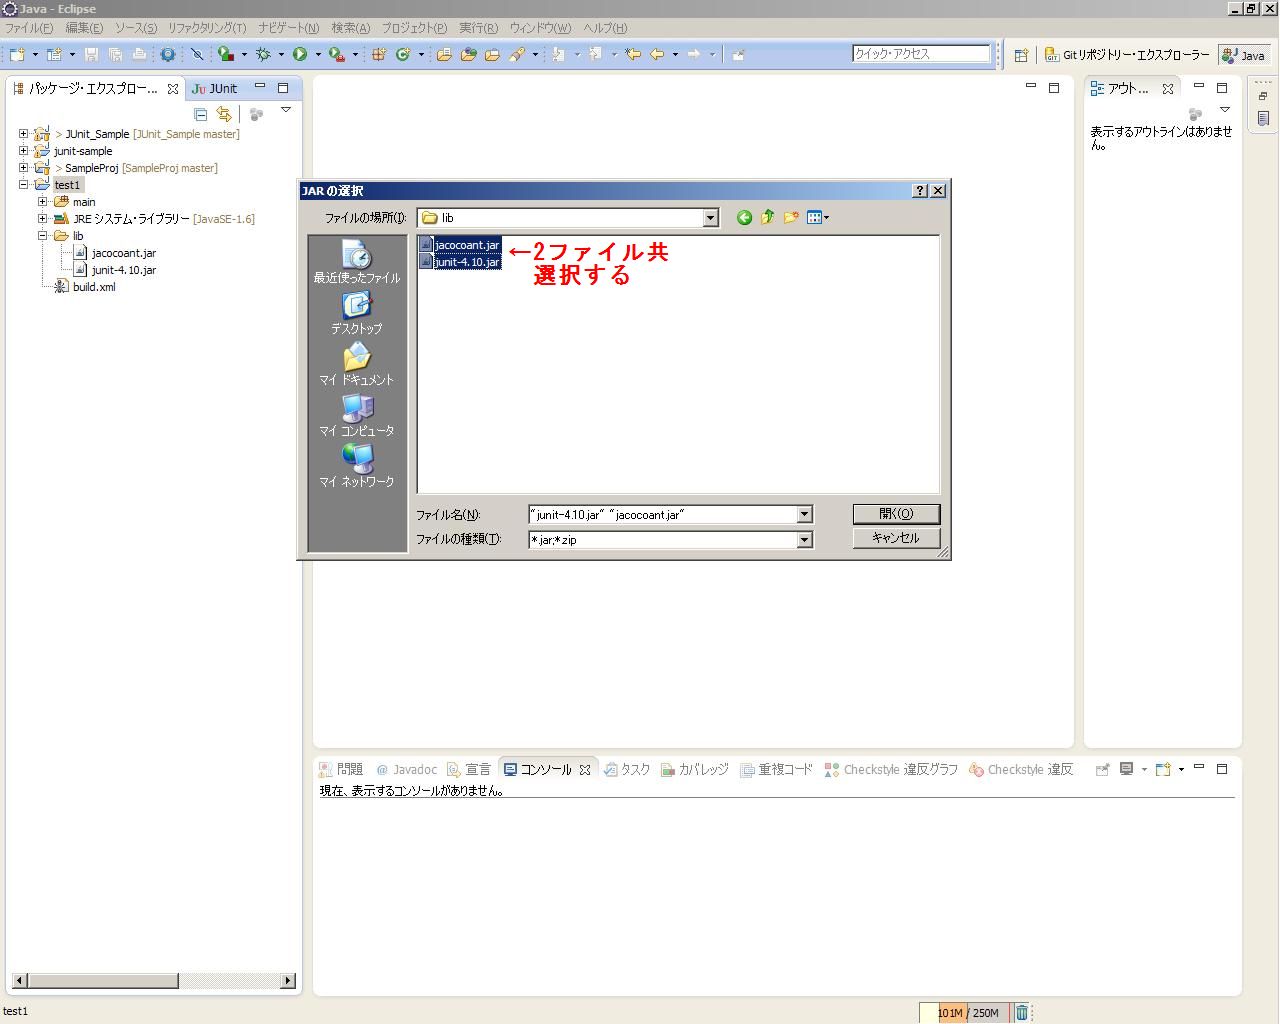
先ほど追加した「lib」フォルダの中にある「jacocoant.jar」「junit-4.10.jar」を選択して
「開く」ボタンを押下して下さい。
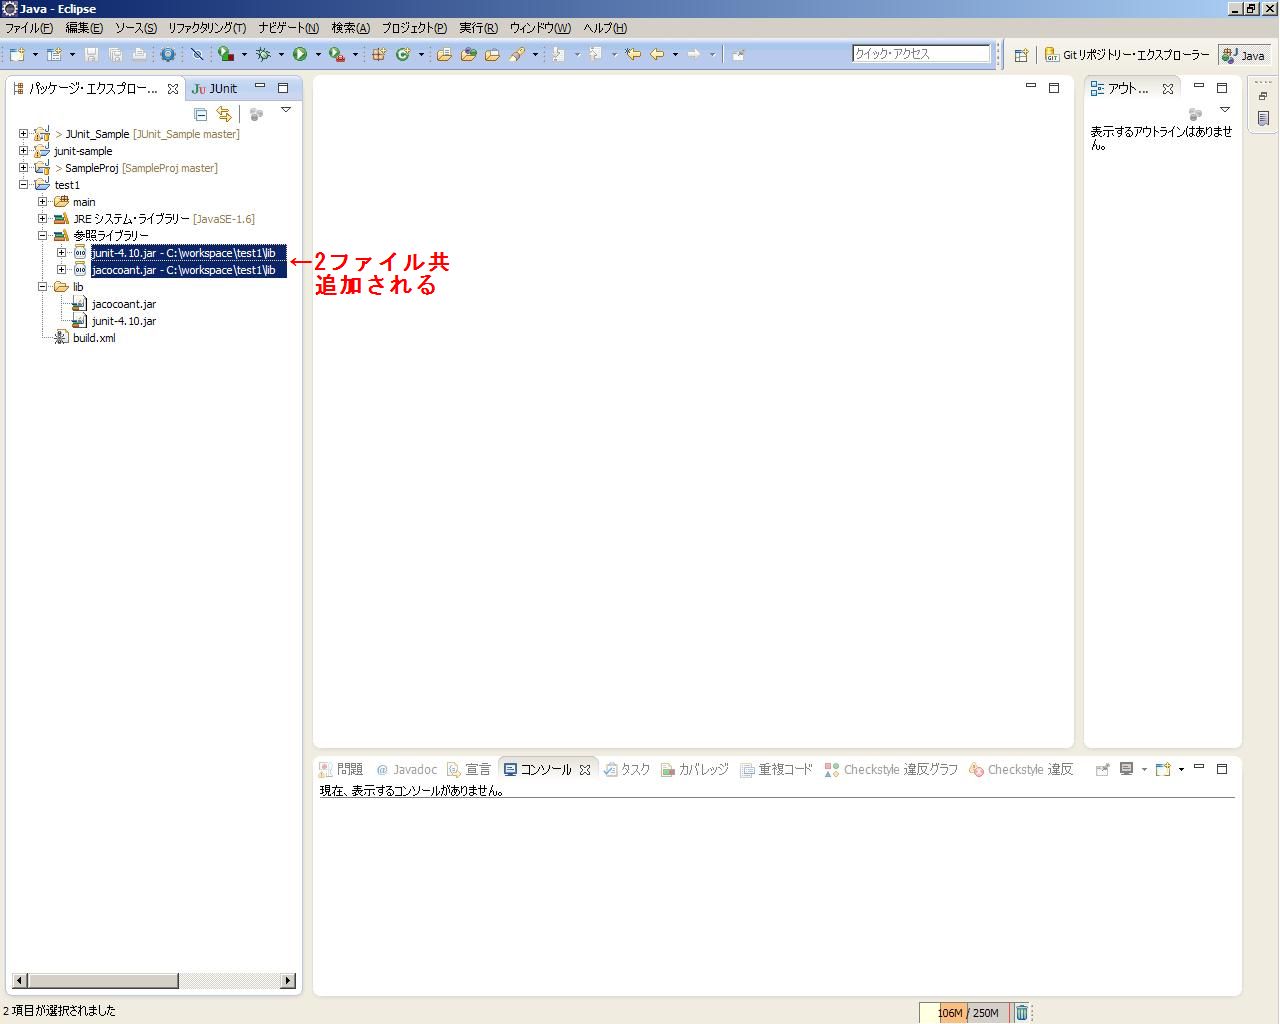
上記画面のように「参照ライブラリー」が追加され、その中に先ほど追加した「jacocoant.jar」「junit-4.10.jar」ファイルが表示されます。
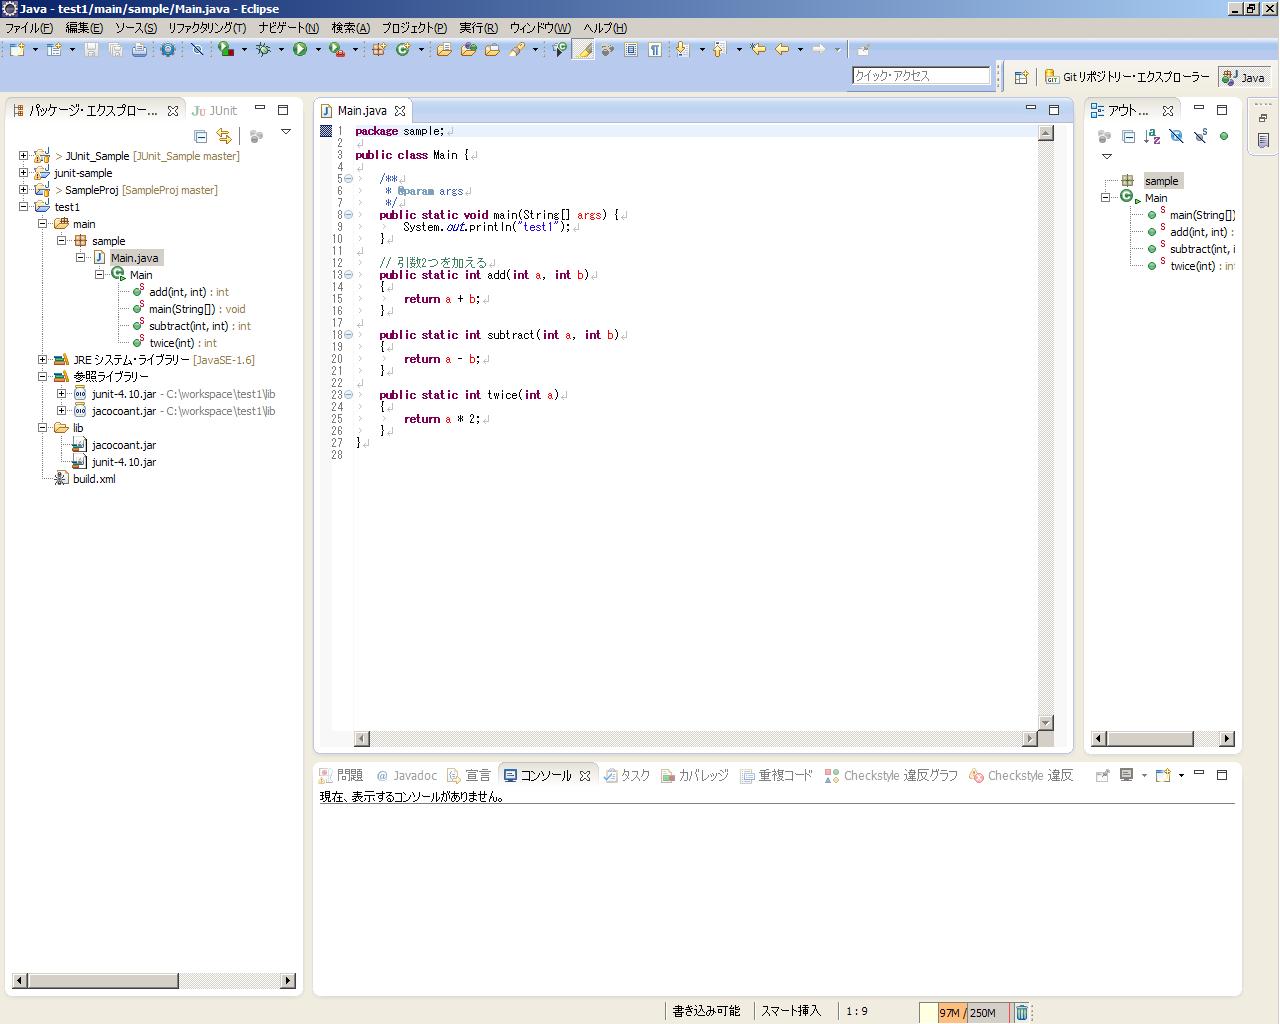
前回作成したMain.javaを以下のように変更します。
追加コードは簡単な足し算と引き算と掛け算の内容です。
										package sample;

										public class Main {

											/**
											 * @param args
											 */
											public static void main(String[] args) {
												System.out.println("test1");
											}

											// 引数2つを加える
											public static int add(int a, int b)
											{
												return a + b;
											}

											public static int subtract(int a, int b)
											{
												return a - b;
											}

											public static int twice(int a)
											{
												return a * 2;
											}
										}
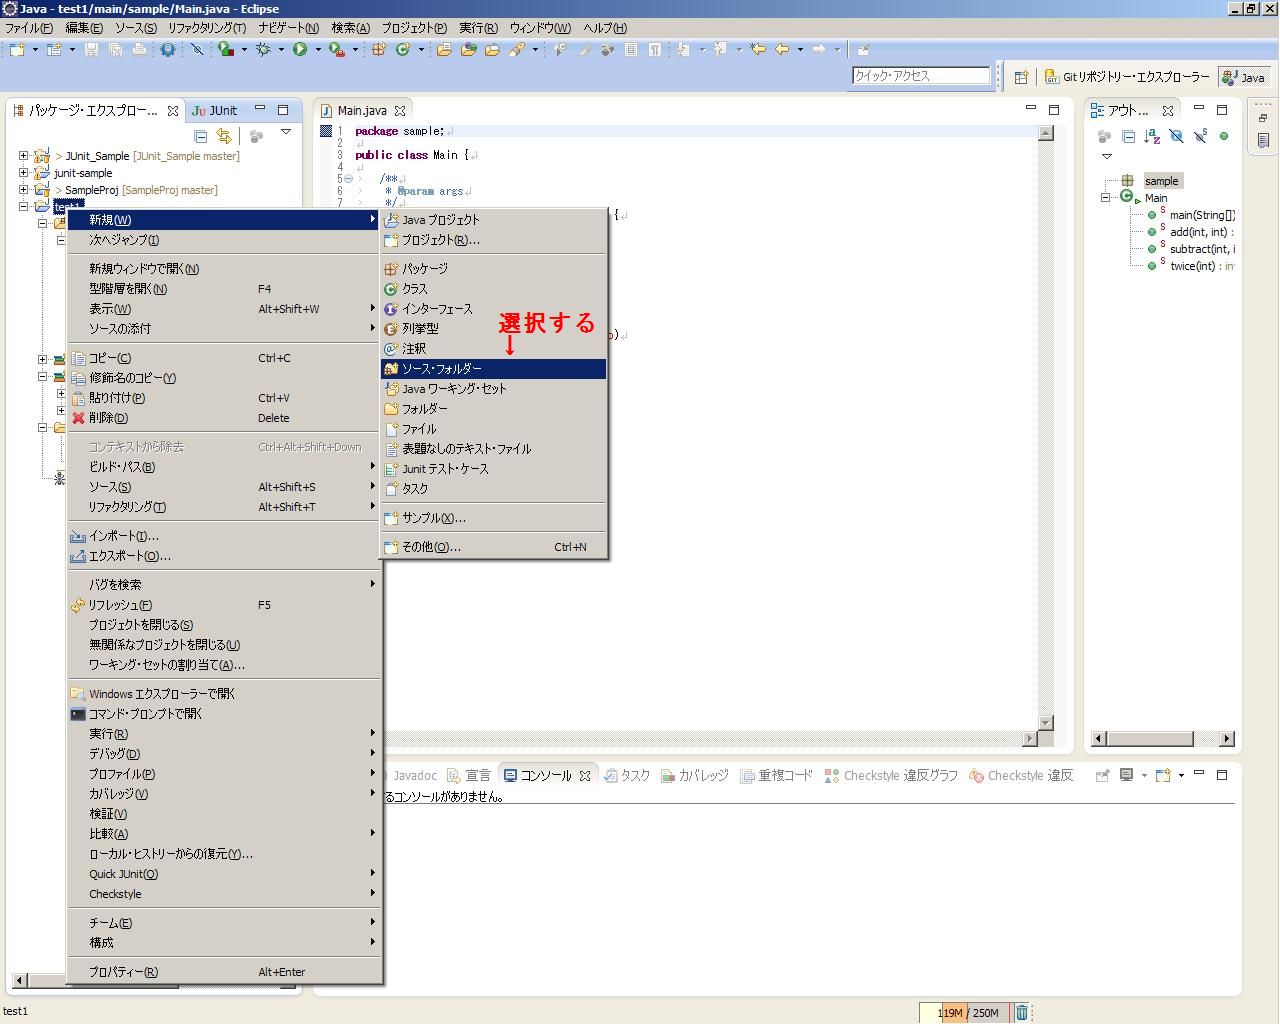
次にユニットテスト用のコードを入れるフォルダを作成します。
「test1」プロジェクトを右クリックして「ソース・フォルダー」を選択して下さい。
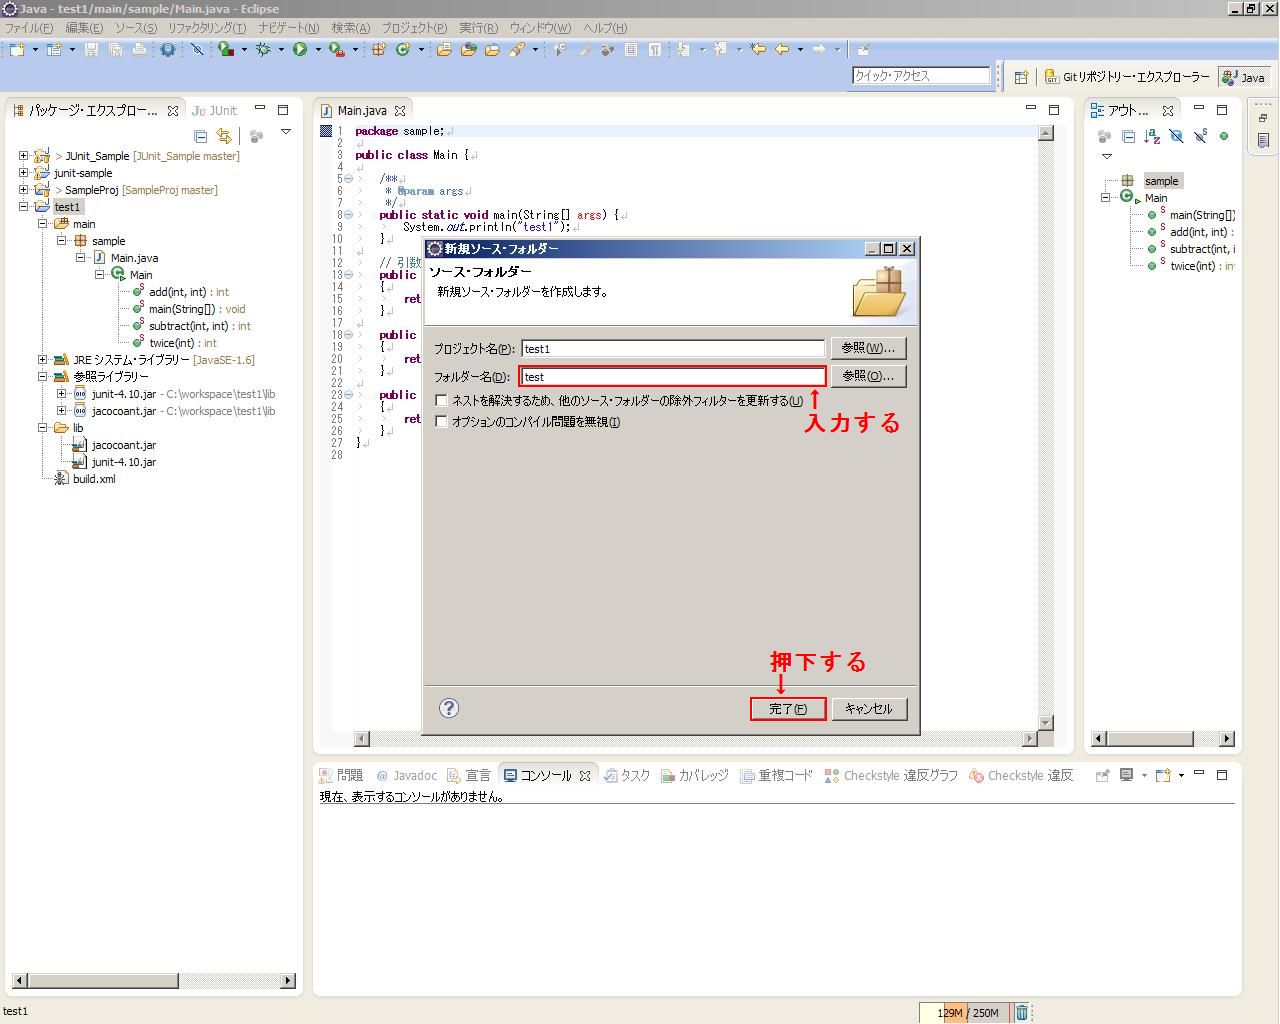
画面が開いたら、「フォルダ名」に「test」と入力して下さい。
「完了」ボタンを押下して下さい。

上記画像のように「test」フォルダが追加されています。
次にユニットテストコードを作成します。
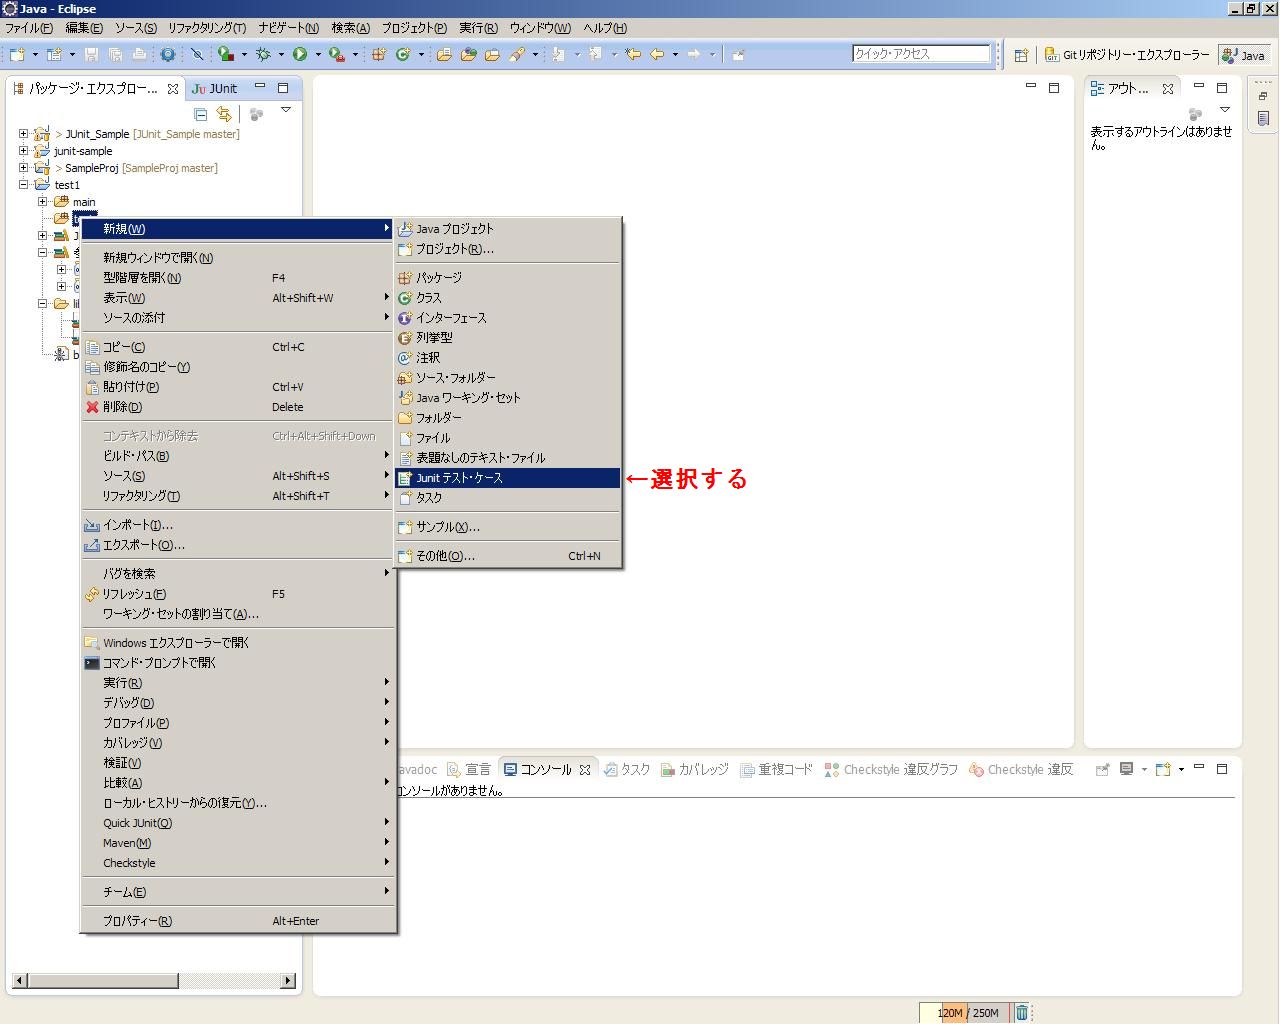
「test1」プロジェクトを右クリックして「JUnitテスト・ケース」を選択して下さい。
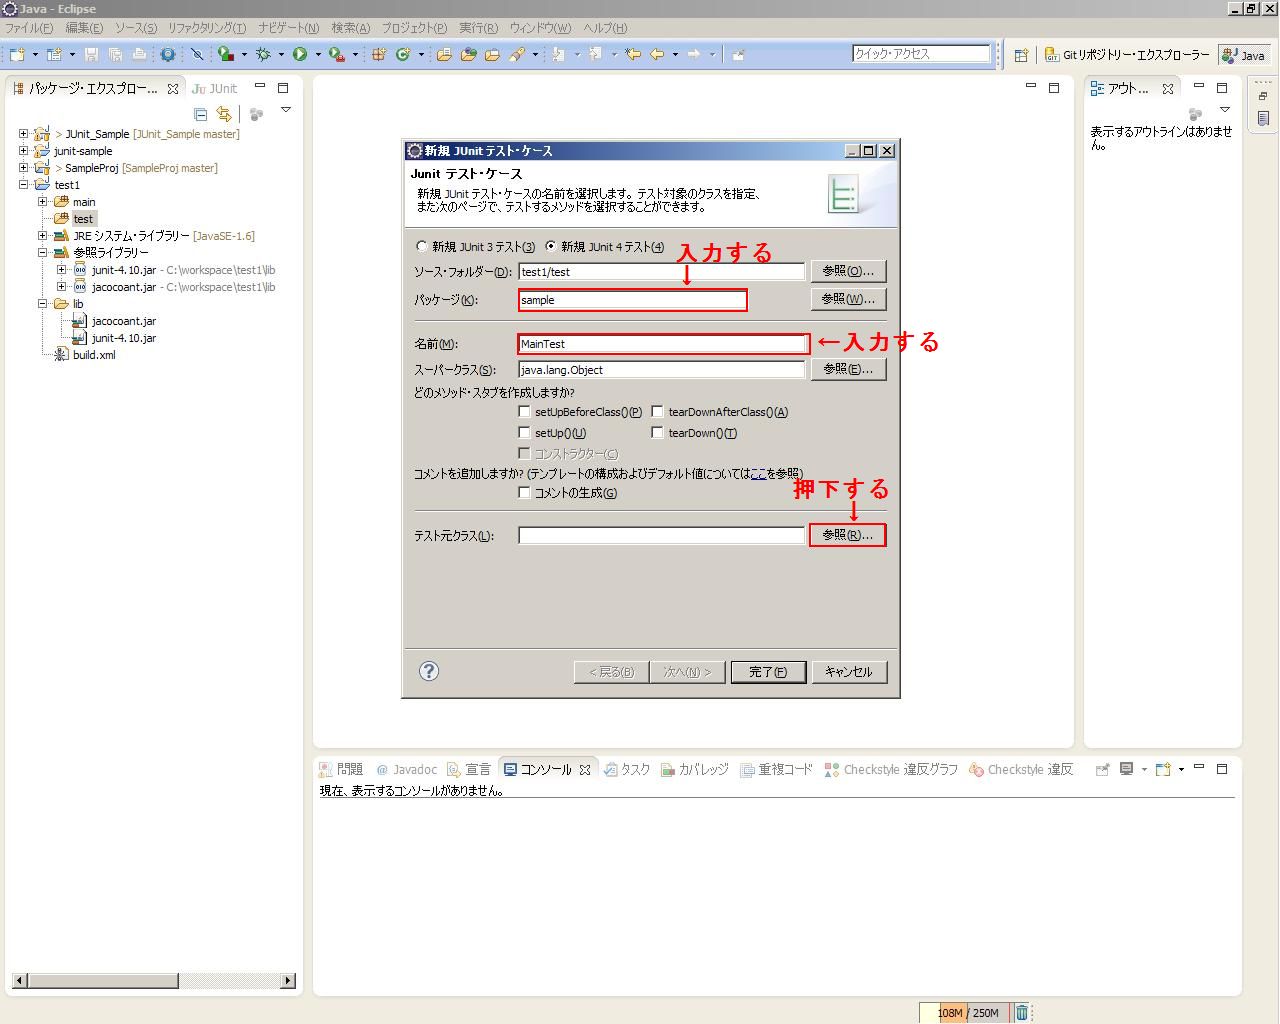
上記画面が開いたら「パッケージ」には「sample」と入力して下さい。
「名前」には「MainTest」と入力して下さい。
「テスト元クラス」の参照ボタンを押下して下さい。
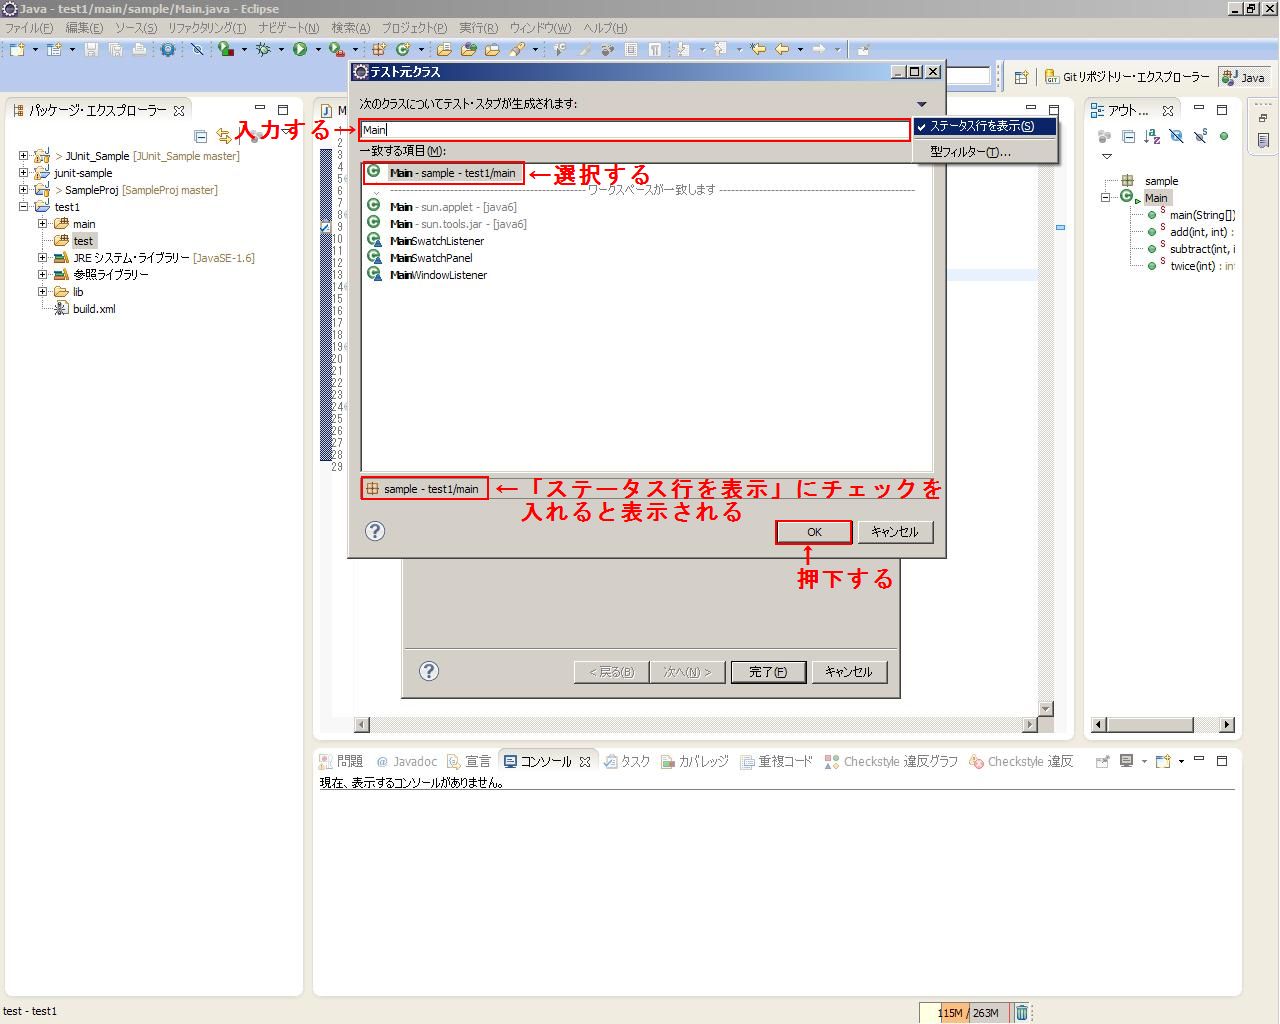
画面が開いたら、最上部のテキストボックスに「Main」と入力して下さい。
「一致する項目」の中から「test1/main」を選択して下さい。
選択完了後、「OK」ボタンを押下して下さい。
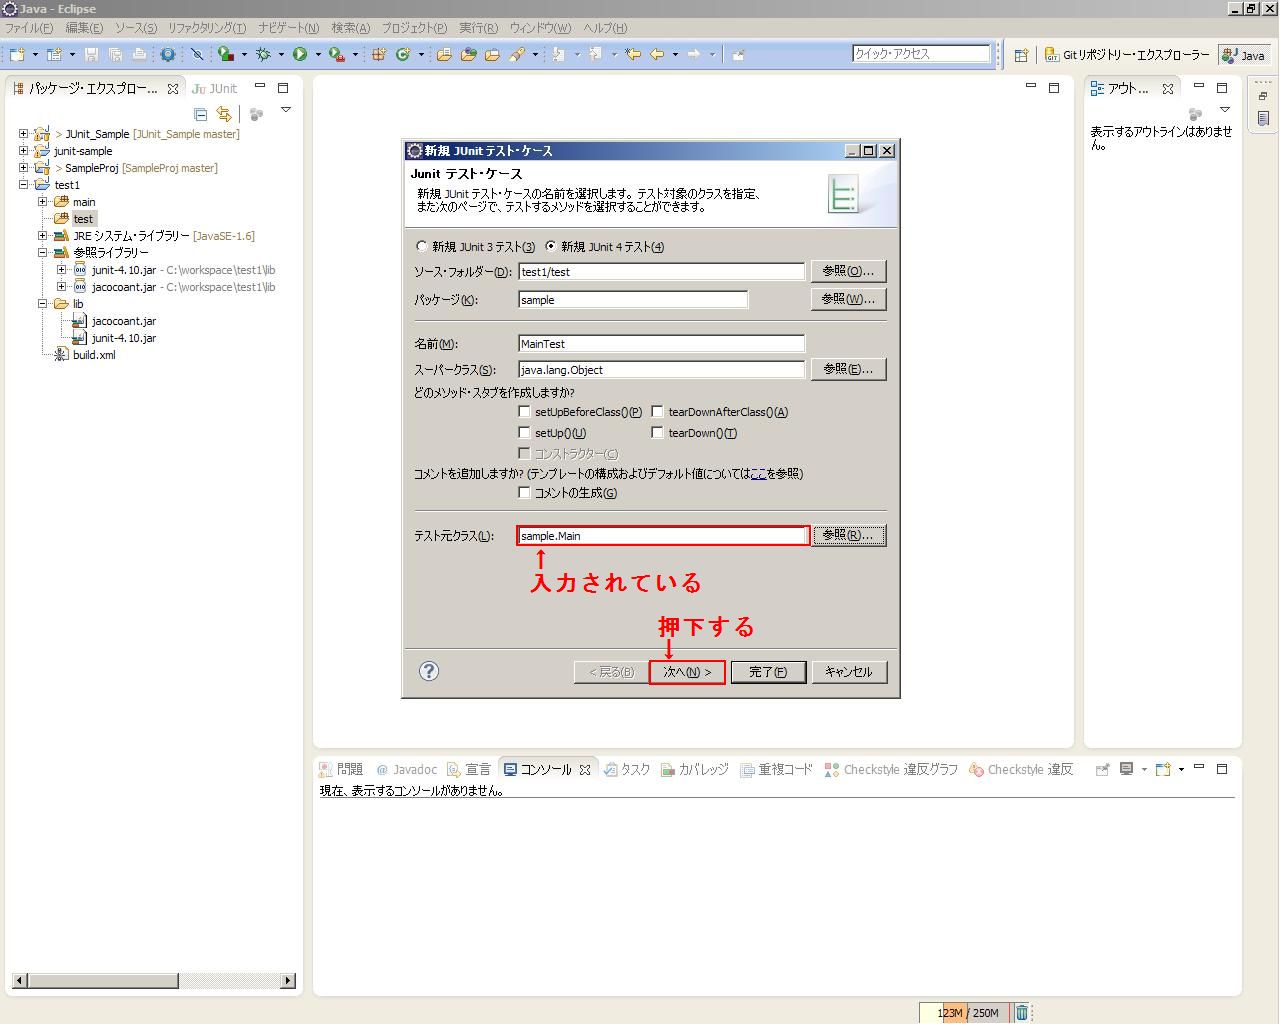
「テスト元クラス」が入力されています。
「次へ」ボタンを押下して下さい。
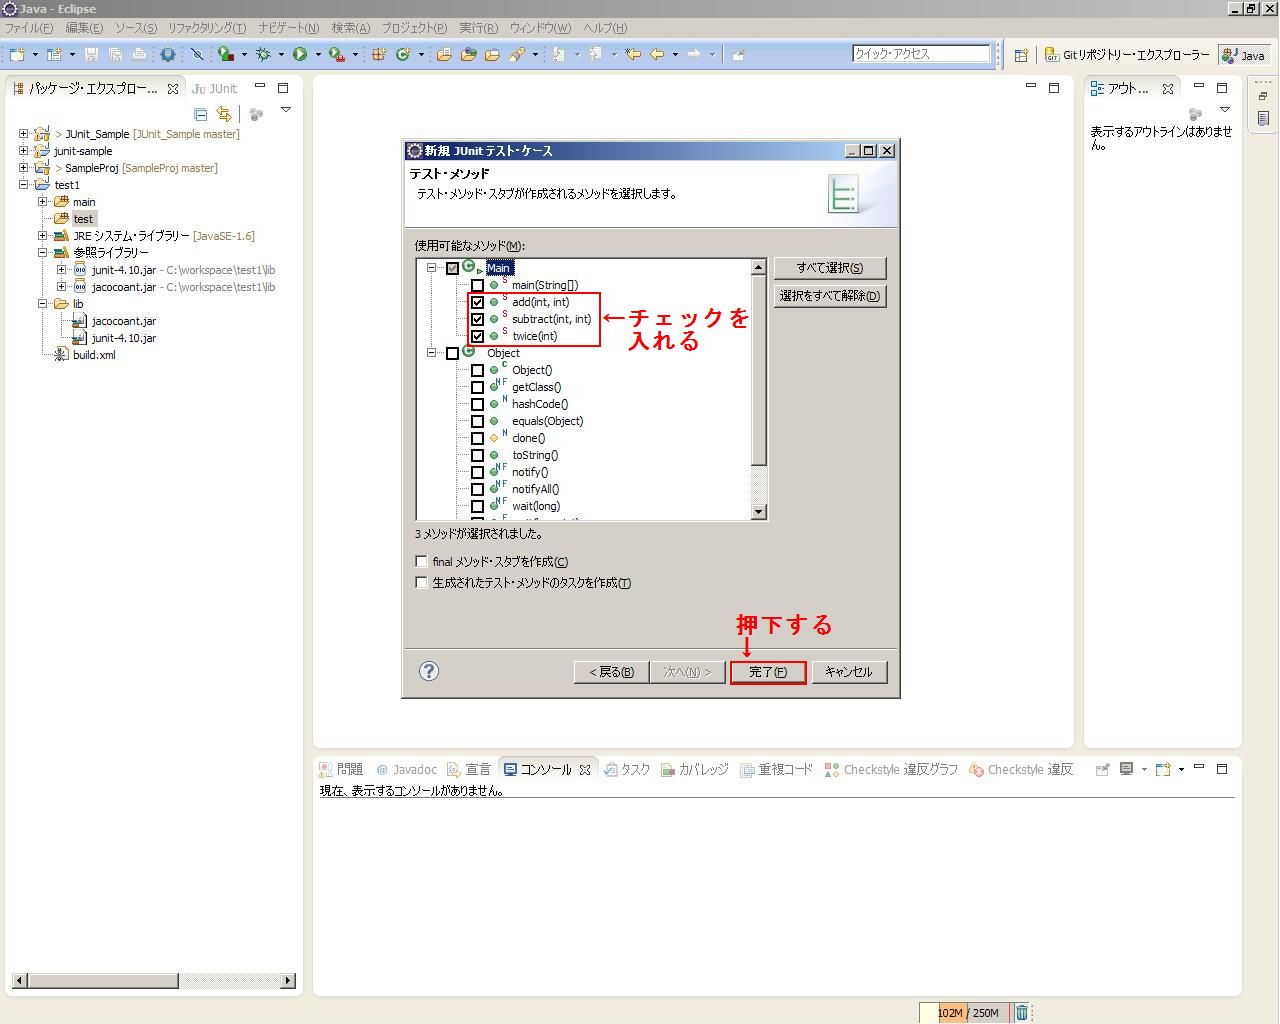
上記画面が開いたら、Mainクラスの中のテストを実施する関数を選択します。
今回は「add」「subtract」「twice」の関数にチェックを入れて選択します。
選択が完了したら、「完了」ボタンを押下して下さい。
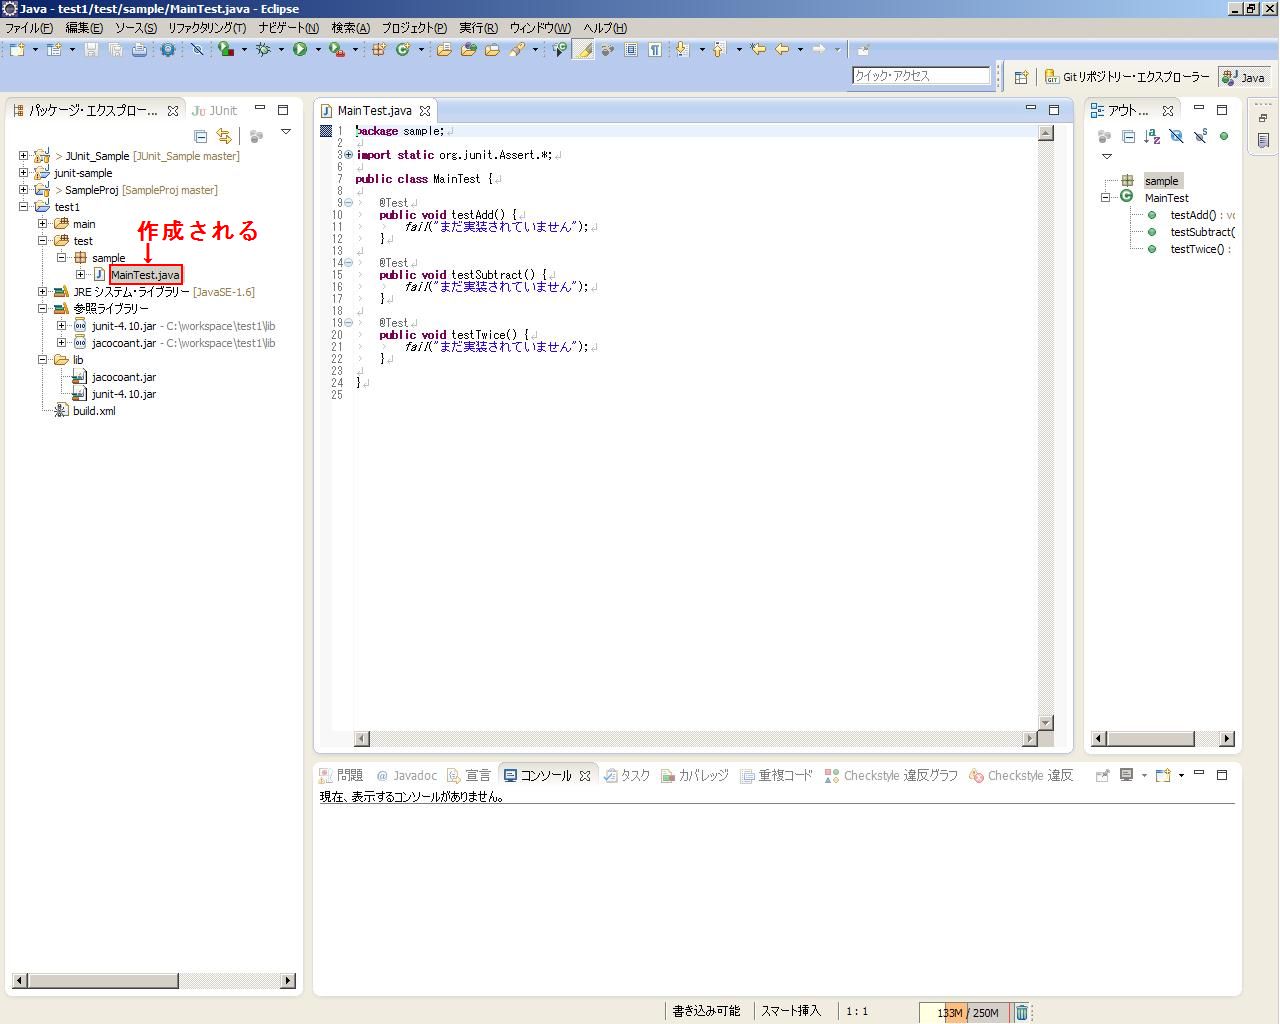
MainTest.javaのファイルが作成されています。

Line3の中身を開くと上記の画面のような内容であることを確認して下さい。
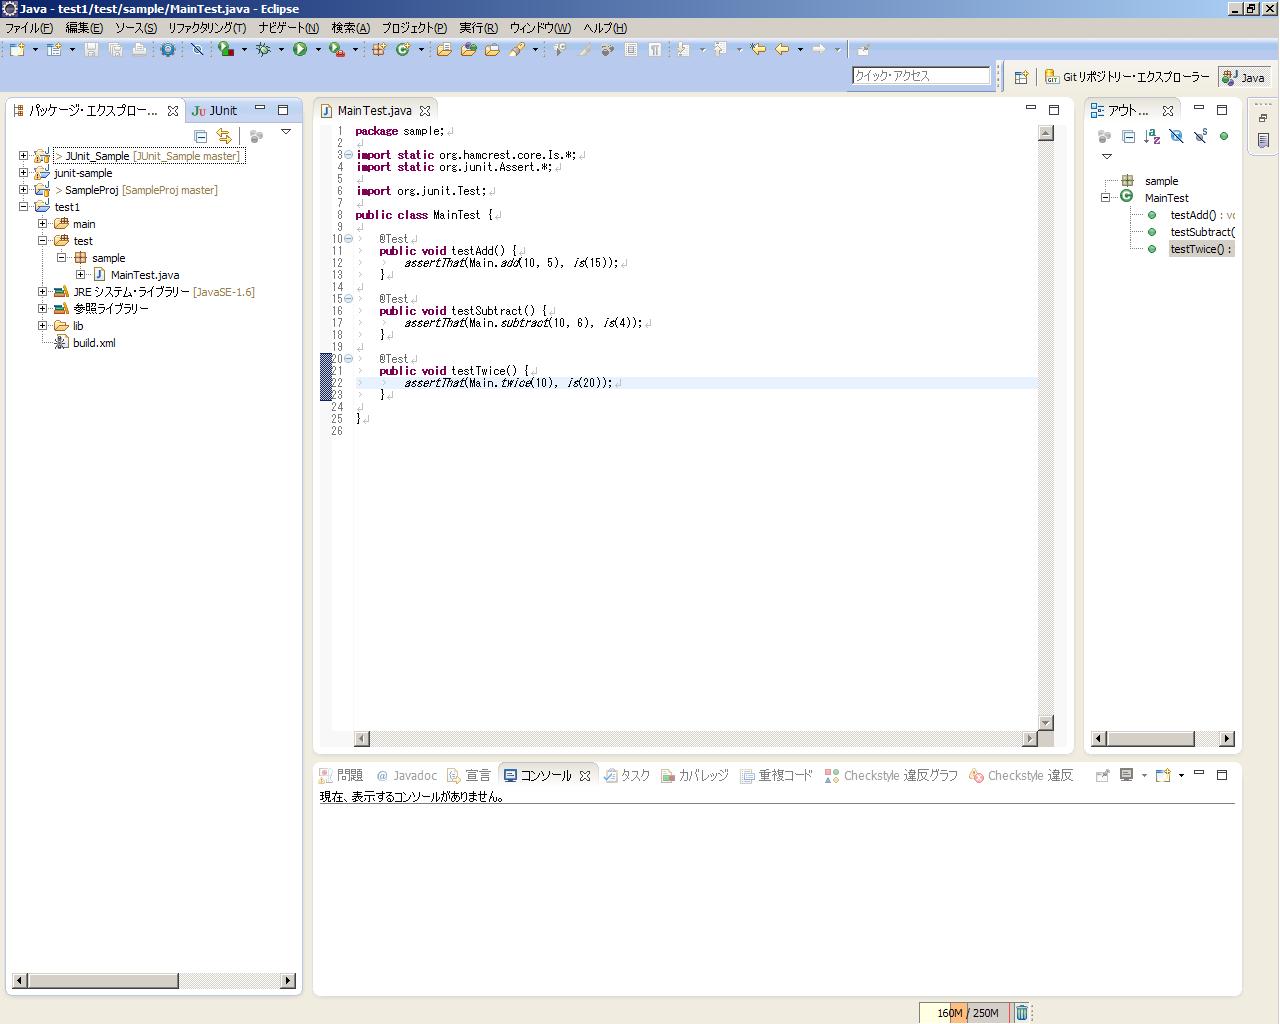
MainTest.javaを以下のように変更します。
このテストコードは、Mainクラスの計算が正しいかどうか確認しています。
										package sample;

										import static org.hamcrest.core.Is.*;
										import static org.junit.Assert.*;

										import org.junit.Test;

										public class MainTest {

											@Test
											public void testAdd() {
												assertThat(Main.add(10, 5), is(15));
											}

											@Test
											public void testSubtract() {
												assertThat(Main.subtract(10, 6), is(4));
											}

											@Test
											public void testTwice() {
												assertThat(Main.twice(10), is(20));
											}

										}
次に「build.xml」を変更します。
以下のように修正します。
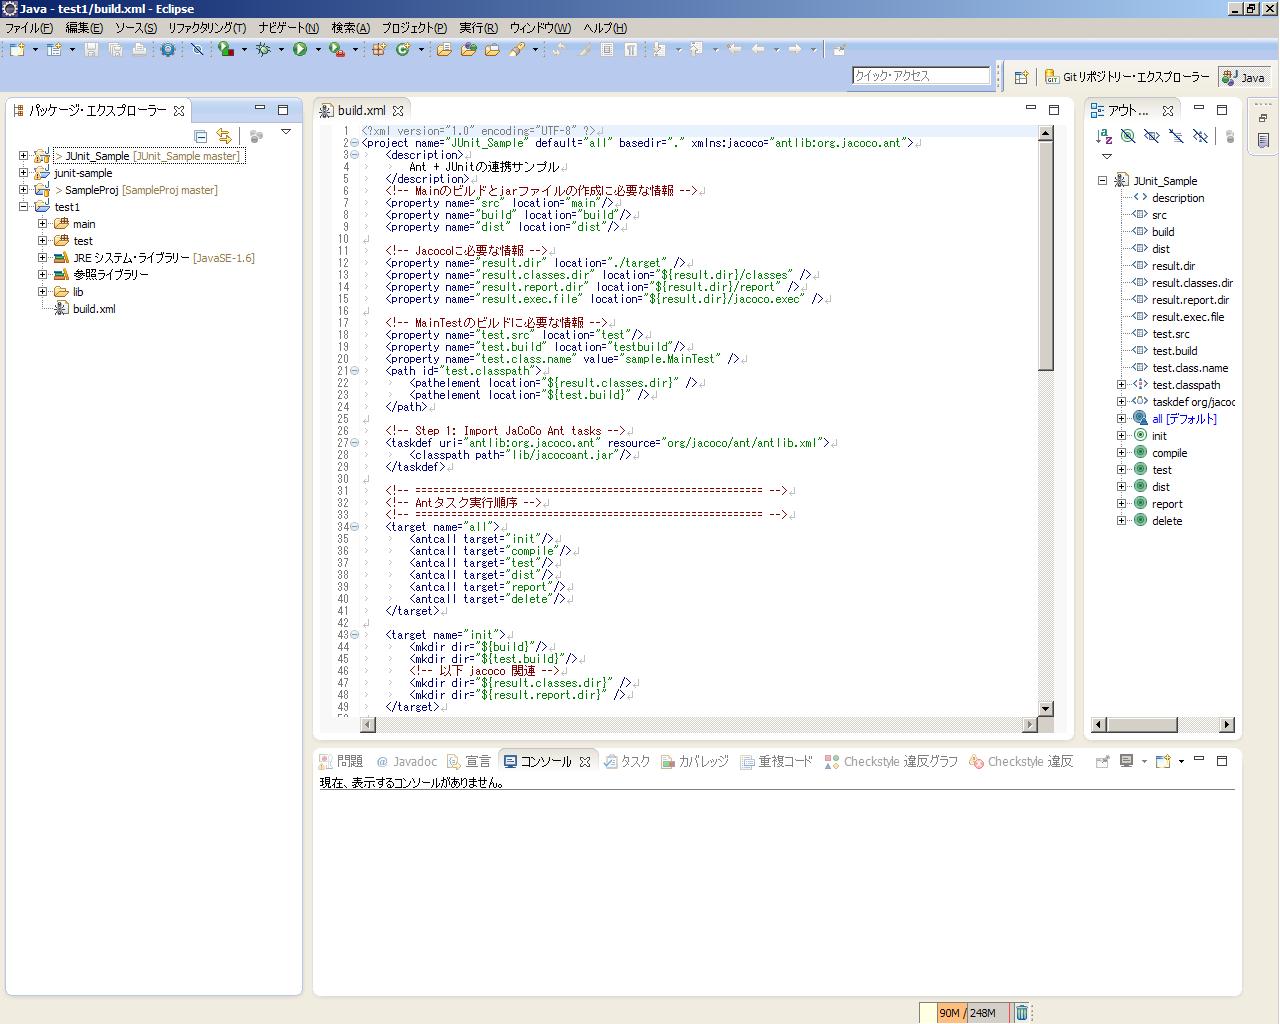
										<?xml version="1.0" encoding="UTF-8" ?>
										<project name="JUnit_Sample" default="all" basedir="." xmlns:jacoco="antlib:org.jacoco.ant">
											<description>
												Ant + JUnitの連携サンプル
											</description>
											<!-- Mainのビルドとjarファイルの作成に必要な情報 -->
											<property name="src" location="main"/>
											<property name="build" location="build"/>
											<property name="dist" location="dist"/>

											<!-- Jacocoに必要な情報 -->
											<property name="result.dir" location="./target" />
											<property name="result.classes.dir" location="${result.dir}/classes" />
											<property name="result.report.dir" location="${result.dir}/report" />
											<property name="result.exec.file" location="${result.dir}/jacoco.exec" />

											<!-- MainTestのビルドに必要な情報 -->
											<property name="test.src" location="test"/>
											<property name="test.build" location="testbuild"/>
											<property name="test.class.name" value="sample.MainTest" />
											<path id="test.classpath">
												<pathelement location="${result.classes.dir}" />
												<pathelement location="${test.build}" />
											</path>

											<!-- Step 1: Import JaCoCo Ant tasks -->
											<taskdef uri="antlib:org.jacoco.ant" resource="org/jacoco/ant/antlib.xml">
												<classpath path="lib/jacocoant.jar"/>
											</taskdef>

											<!-- ========================================================== -->
											<!-- Antタスク実行順序 -->
											<!-- ========================================================== -->
											<target name="all">
												<antcall target="init"/>
												<antcall target="compile"/>
												<antcall target="test"/>
												<antcall target="dist"/>
												<antcall target="report"/>
												<antcall target="delete"/>
											</target>

											<target name="init">
												<mkdir dir="${build}"/>
												<mkdir dir="${test.build}"/>
												<!-- 以下 jacoco 関連 -->
												<mkdir dir="${result.classes.dir}" />
												<mkdir dir="${result.report.dir}" />
											</target>

											<target name="compile" description="compile the source " >
												<!-- Mainをコンパイルし、buildフォルダに出力 -->
												<javac srcdir="${src}" destdir="${result.classes.dir}" debug="true" includeAntRuntime="no"/>

												<!-- MainTestをビルドし、testbuildフォルダに出力 -->
												<javac srcdir="${test.src}" destdir="${test.build}" debug="true" includeAntRuntime="no">
													<classpath path="lib/junit-4.10.jar"/>
													<classpath refid="test.classpath" />
												</javac>
											</target>

											<target name="test" description="test the source " >
												<!-- Step 2: Wrap test execution with the JaCoCo coverage task -->
												<jacoco:coverage destfile="${result.exec.file}">
													<!-- JUnitによるテストを実行 -->
													<junit fork="yes" haltonfailure="yes">
														<classpath path="lib/junit-4.10.jar"/>
														<test name="${test.class.name}" />
														<formatter type="xml" usefile="true" />
														<classpath refid="test.classpath" />
													</junit>
												</jacoco:coverage>
											</target>

											<target name="dist" description="generate the distribution" >
												<!-- Create the time stamp -->
												<tstamp/>
												<!-- jarファイルの出力先ディレクトリを作成 -->
												<mkdir dir="${dist}"/>
												<!-- sample-yyyymmdd.jarという名前でjarファイルを作成 -->
												<jar jarfile="${dist}/sample-${DSTAMP}.jar" basedir="${build}">
													<manifest>
														<attribute name="Main-Class" value="sample.Main" />
													</manifest>
											    </jar>
											</target>

											<target name="report" description="make report" >
												<!-- Step 3. Create coverage report -->
												<jacoco:report>
													<!-- This task needs the collected execution data and ... -->
													<executiondata>
														<file file="${result.exec.file}" />
													</executiondata>

													<!-- the class files and optional source files ... -->
													<structure name="JaCoCo Ant Example">
														<classfiles>
															<fileset dir="${result.classes.dir}" />
														</classfiles>
														<sourcefiles encoding="UTF-8">
															<fileset dir="${src}" />
														</sourcefiles>
													</structure>

													<!-- to produce reports in different formats. -->
													<html destdir="${result.report.dir}" />
													<csv destfile="${result.report.dir}/report.csv" />
													<xml destfile="${result.report.dir}/report.xml" />
												</jacoco:report>
											</target>

											<target name="delete" description="delete mkdir" >
												<delete includeEmptyDirs="true" >
													<fileset dir="${build}" />
													<fileset dir="${test.build}" />
													<fileset dir="${dist}" />
												</delete>
											</target>
										</project>
以下に大まかな説明を記載します。
line 2: build.xmlのプロジェクトにjacocoを使用するための指定が追加されています。
line 11〜15: ここではJacocoに必要な情報を追加しています。
line 17〜24: 追加したユニットテスト用のMainTest.javaで必要な情報を追加しています。
line 22: Main.javaで作成されたクラスを参照するディレクトリを指定しています。
そのためline 53のdestdirが「{result.classes.dir}」に変更されていることに注意して下さい。
line 26〜29: Jacocoを使用するためのインポートの処理です。
line 31〜40: タスク処理に「init」「test」「report」が追加されています。。
line 43〜49: 初期化処理として、Jacocoで必要なフォルダの作成が追加されちます。
line 51〜60: コンパイルの処理として、line 55〜59にMainTest.javaのコンパイルが追加されています。
また、line 53のdestdirが変更されていることに注意して下さい。
line 62〜73: 新規に追加した処理です。ここでテストを実施しています。
Jacocoを使用する場合、テスト処理をラップする必要があります。 そのためline 64とline 72でJacocoを規定し、その中のline 66〜71でテストの実行内容が記載されています。
line 66: ユニットテストを規定しています。
line 67: ユニットテストに必要なライブラリのパスを指定しています。
line 68: テスト内容が記載されたクラスファイルを指定しています。
line 69: ユニットテスト実行結果の出力ファイルのフォーマットを指定しています。この場合は「xml」
line 88〜111: 新規に追加した処理です。ここでJacocoカバレッジのレポート作成を実施しています。
ファイルの追加及び修正が完了したら、まず追加したファイルをGitに追加します。
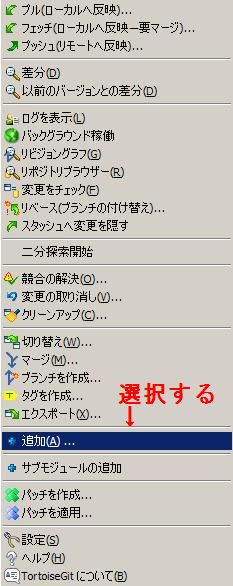
Windowsエクスプローラから「test1」を右クリックし、「TortoiseGit」から「追加」を選択して下さい。
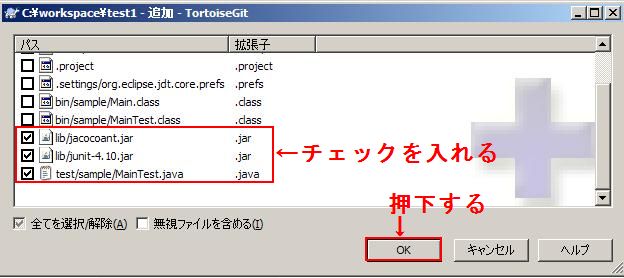
今回追加した「jacocoant.jar」「junit-4.10.jar」「MainTest.java」ファイルにチェックを入れて下さい。
チェックを入れたら「OK」ボタンを押下して下さい。
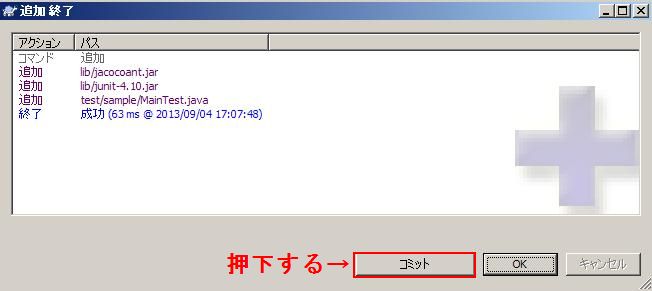
追加が完了したら、引き続きコミットをします。
「コミット」ボタンを押下して下さい。
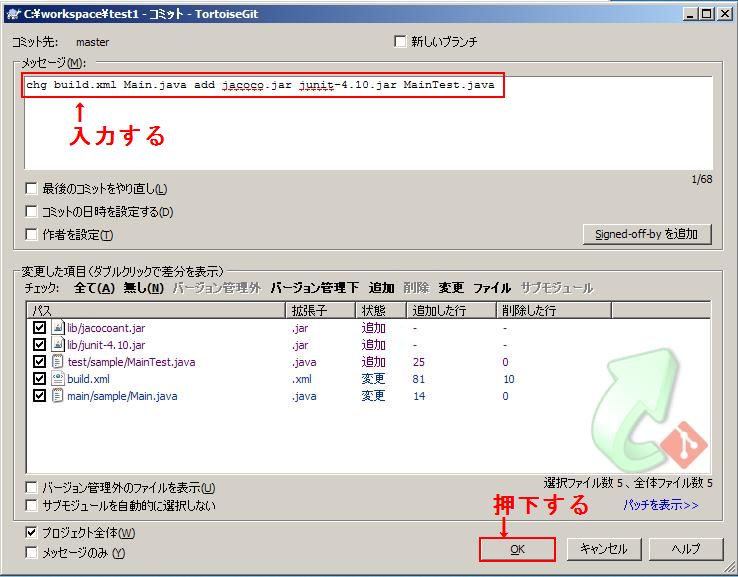
コミットメッセージを入力後、「OK」ボタンを押下して下さい。
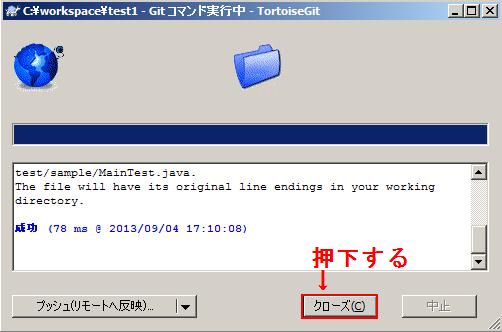
コミットが完了したらいったん「クローズ」ボタンを押下して閉じて下さい。

次にプッシュを実行します。
上記画像のように「プッシュ」を選択して下さい。

リモートが正しいかどうか確認したら「OK」ボタンを押下して下さい。

プッシュ後、自動ビルドが完了するとJenkinsの「test1」ジョブの中は上記画像のような表示に変わります。
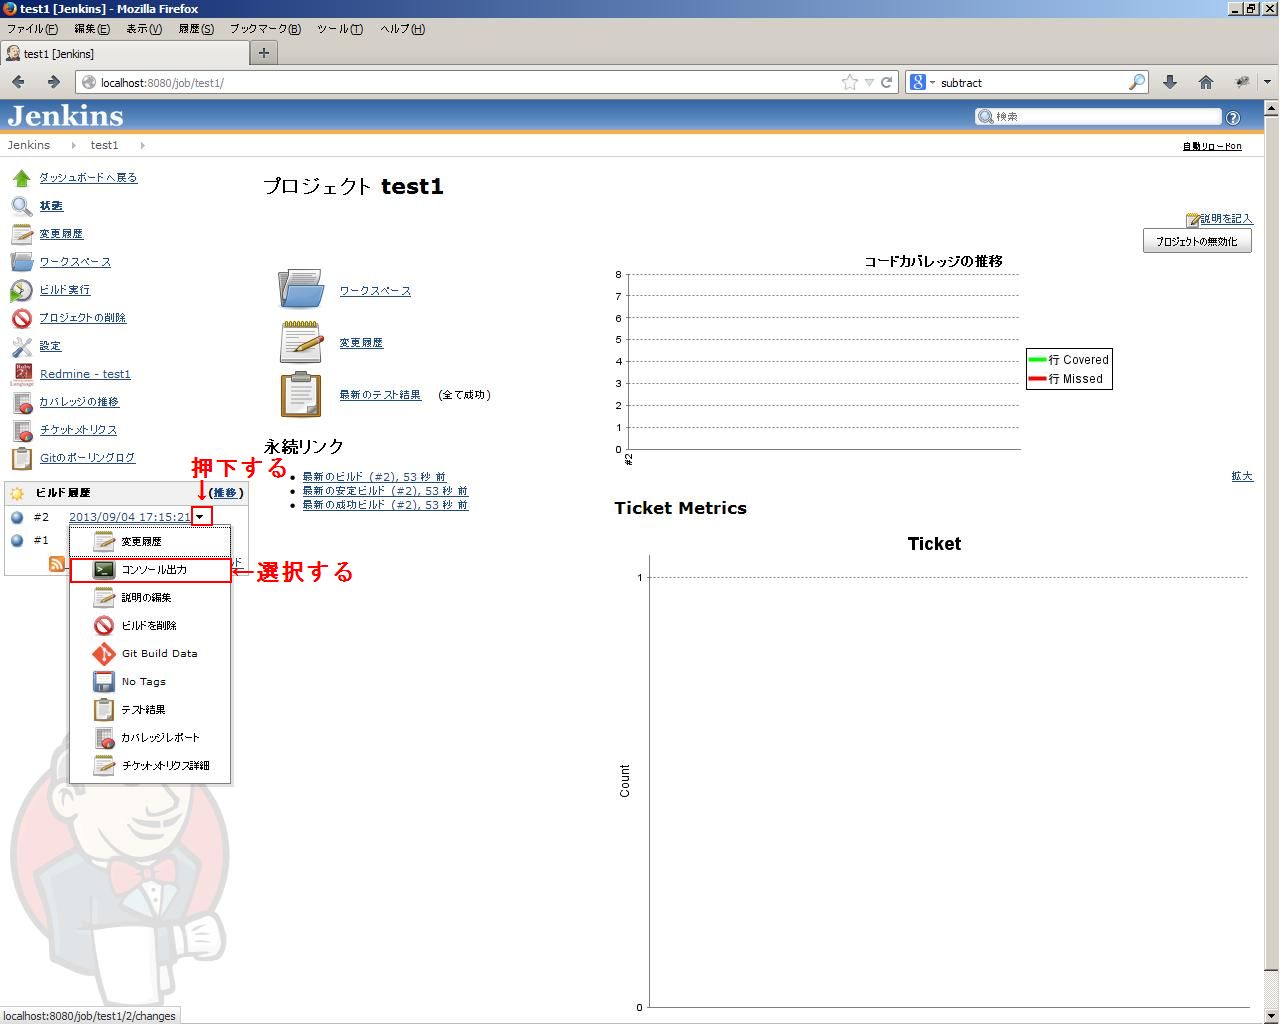
ビルドの中身を確認します。上記画像のようにビルド番号の右側の「▼」を押下して下さい。
リストが表示されるので、「コンソール出力」を選択して下さい。

コンソール出力内容が表示されます。
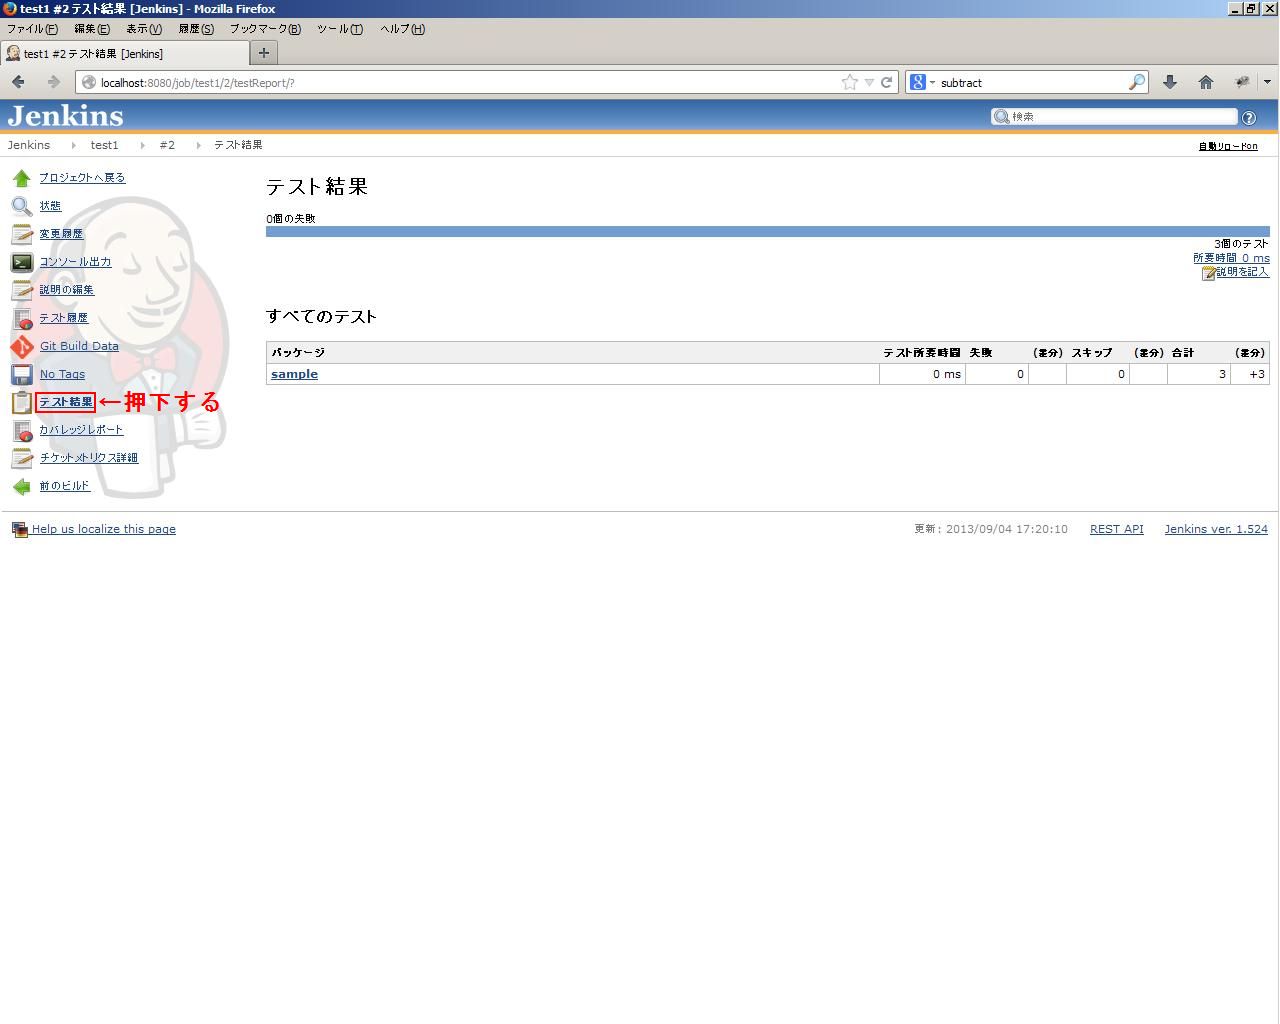
次にメニューにある「テスト結果」を押下して下さい。
実施テストの結果が表示されます。
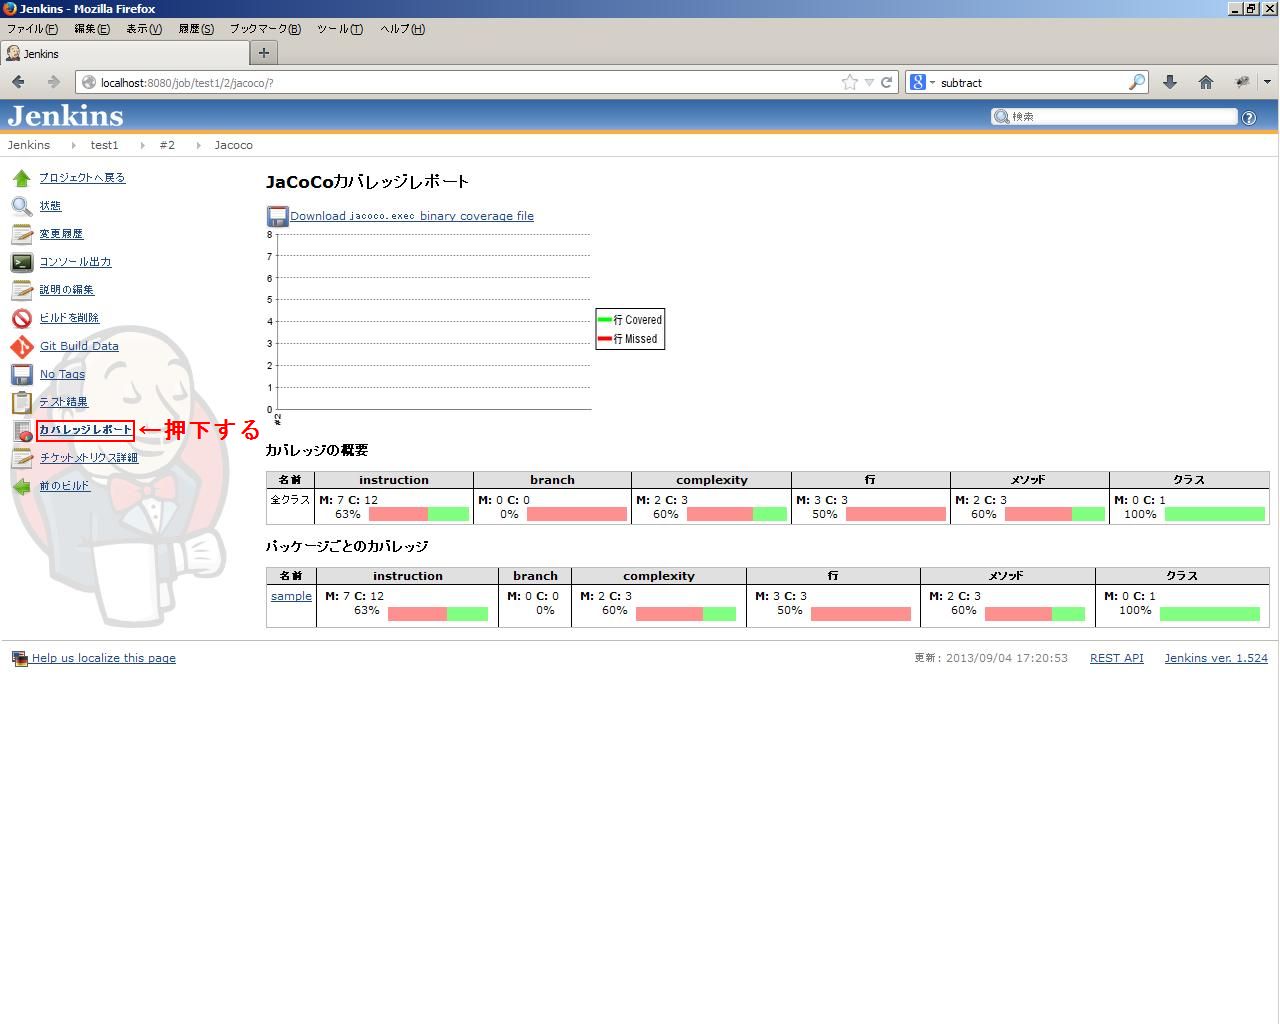
次にメニューにある「カバレッジレポート」を表示して下さい。
各カバレッジ結果が表示されます。

メトリクスの表示の確認をする前に、Redmineの「test1」プロジェクトに新規のチケットを作成して下さい。
作成内容はどのようなものでも構いません。
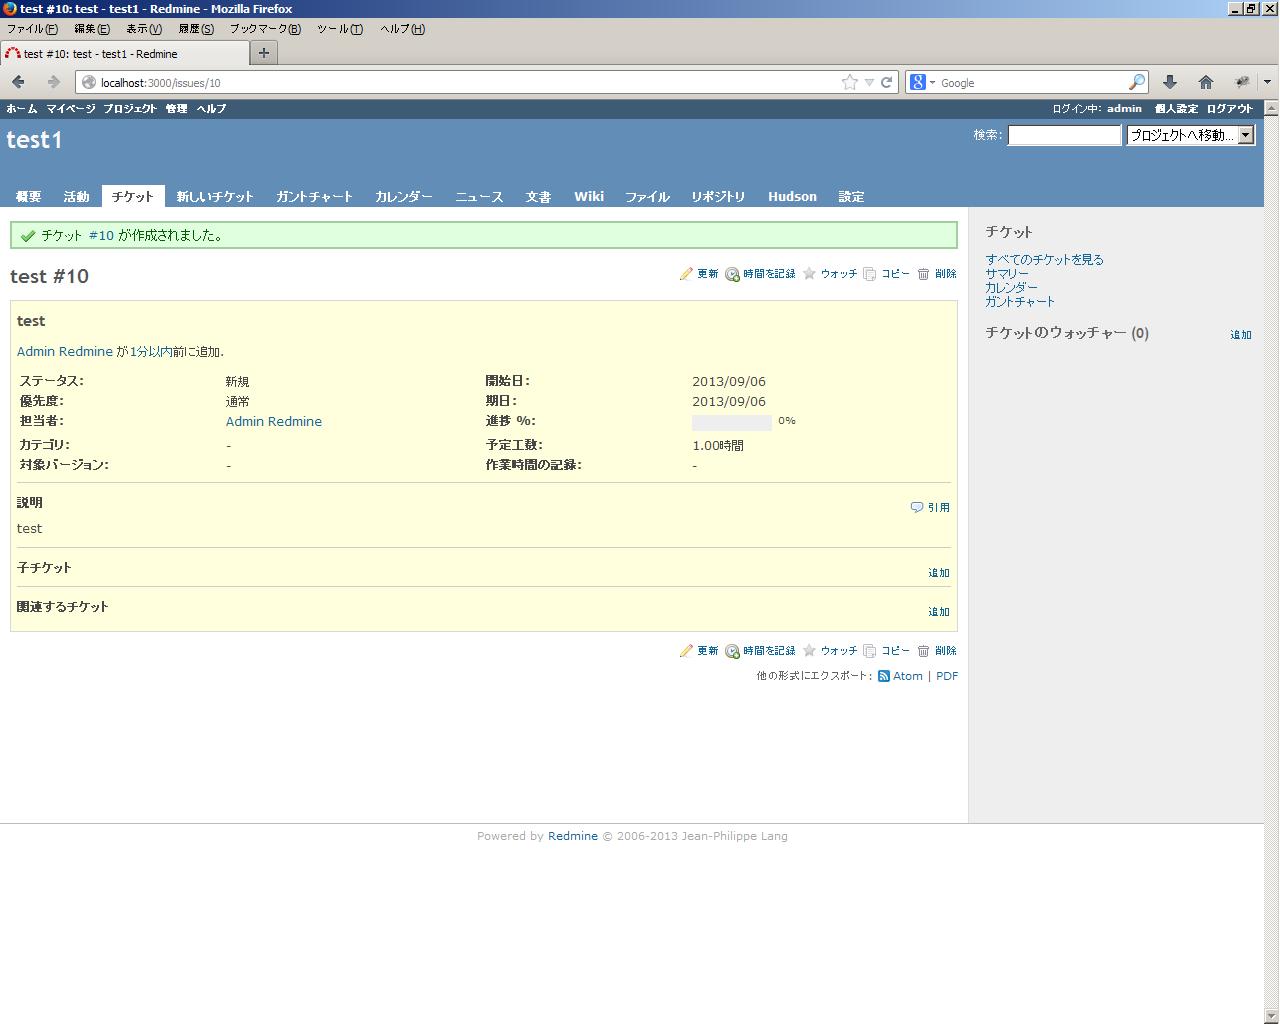
作成が完了すると、上記のような画面が表示されます。
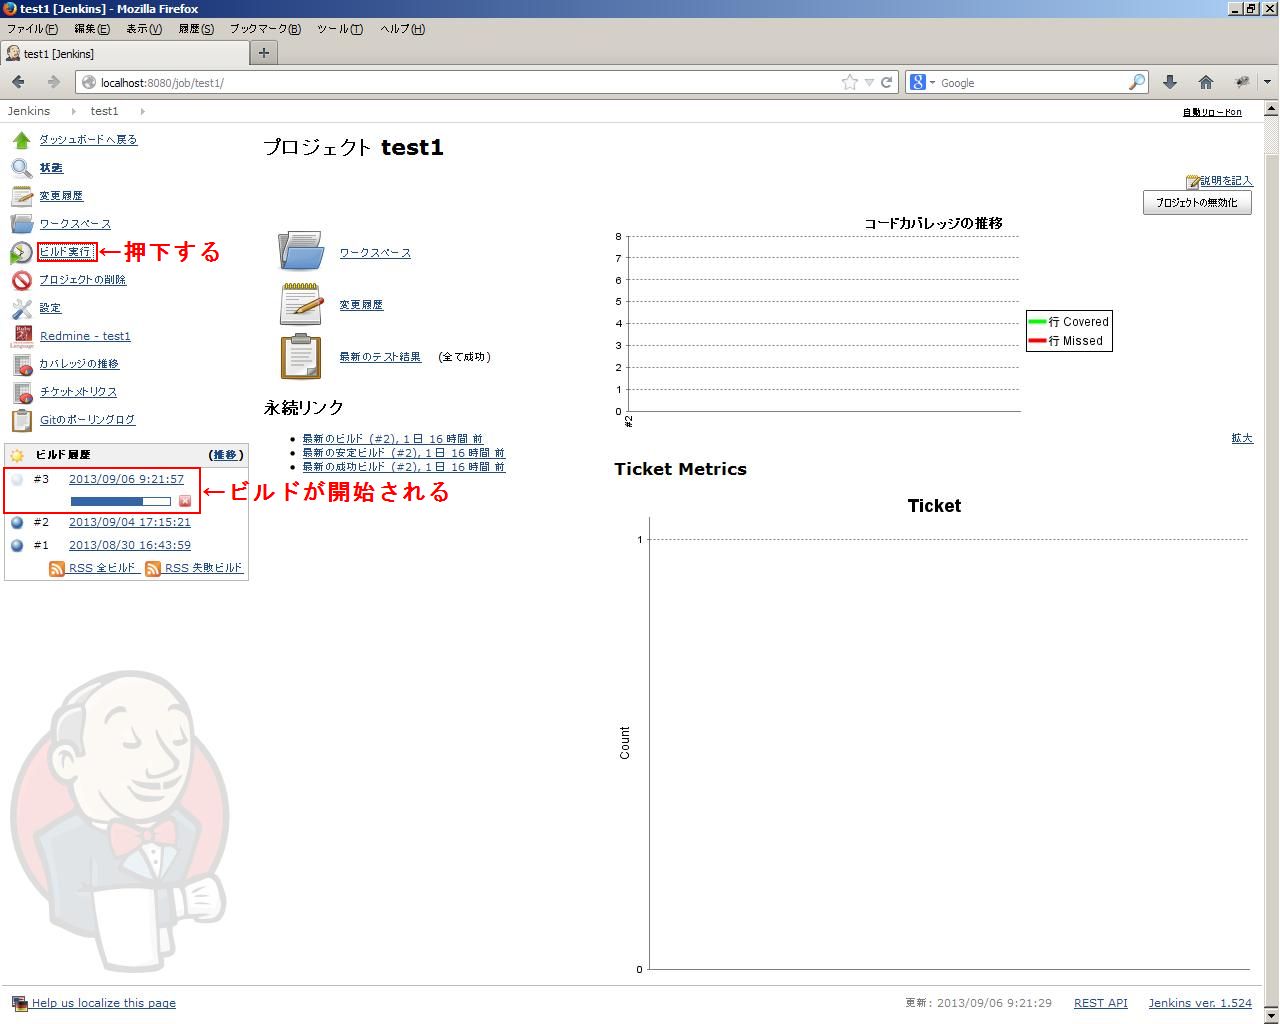
Jenkinsに戻って、「ビルド実行」を押下してビルドを実行して下さい。
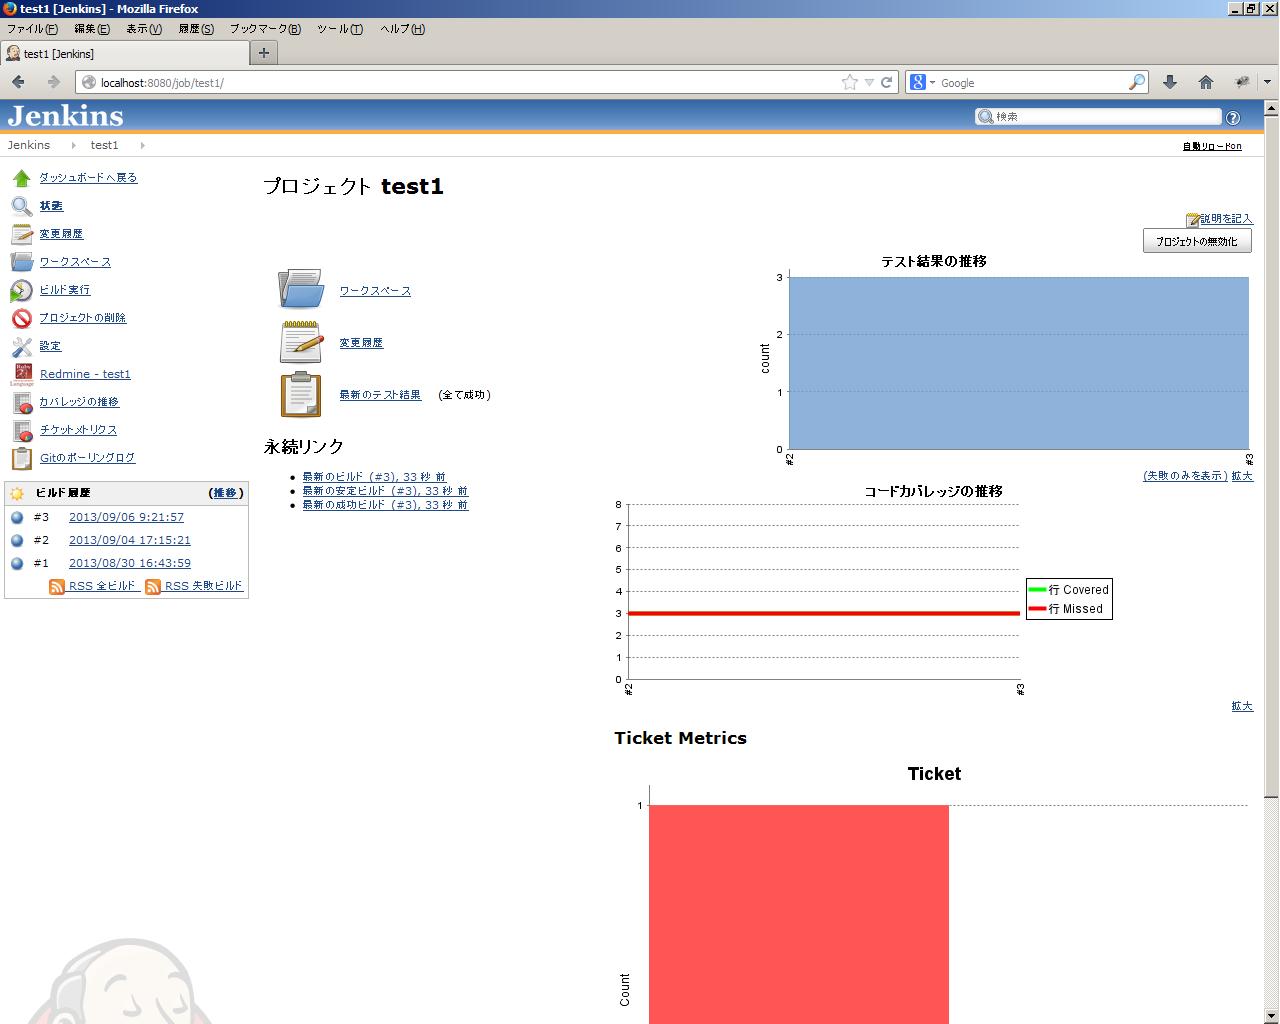
ビルドが完了すると、上記画像のように表示がされます。
チケットメトリクスも含めて、ビルド2から3の間の状態がグラフ化されて表示されます。
※画面がリフレッシュしていない場合は「F5」キーで更新してみてください。
グラフの内容の変更例として、以下の変更を実施して「コミット」→「プッシュ」→自動ビルドすることで変化します。
「テスト結果推移」グラフは「MainTest.java」の計算結果であるis関数の中身を間違った答えに変更することで、表示内容が変化します。
この場合、build.xmlのline 66の「haltonfailure="yes"」するとビルドが途中で終了しない。
「コードカバレッジ」グラフは「Main.java」の「main関数」を削除することで、表示内容が変化します。
「チケットメトリクス」グラフはRedmineのチケットの状態を変更した後にビルドを実施することで、表示内容が変化します。
以上で、自動ビルドからのユニットテストのためのサンプルコード作成と実行は完了しました。
お疲れ様でした。